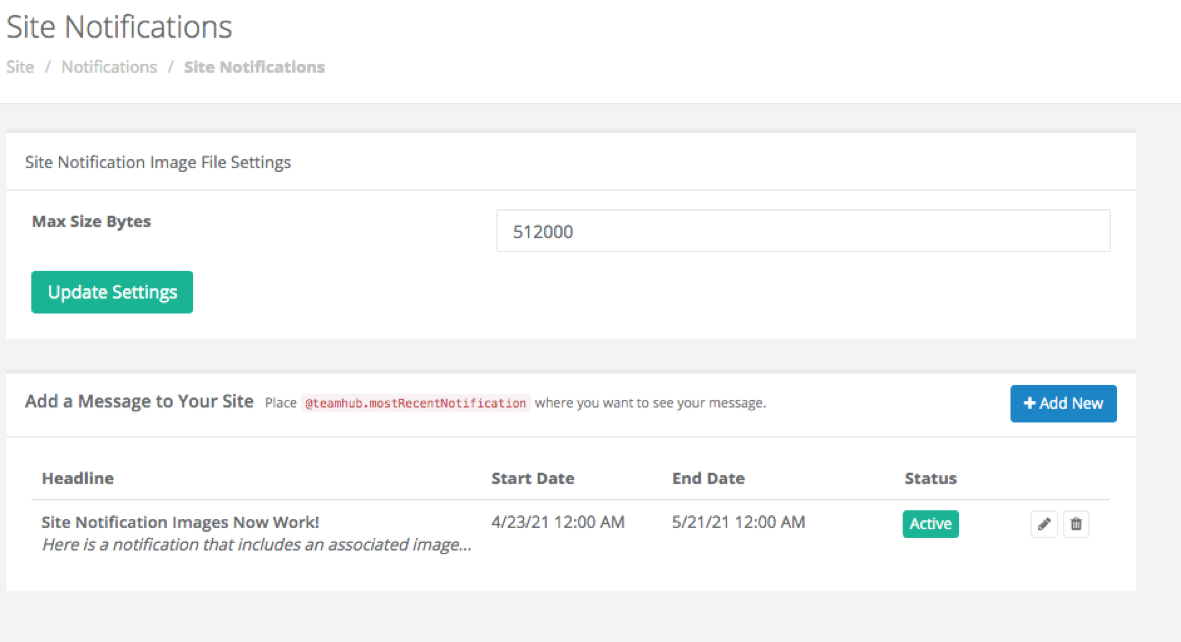
Site Notifications
Access from the Admin Console
Location: Site > Notifications > Site Notifications
Overview
You may need to create a site-wide message to alert your community of something specific, such as site maintenance, holiday notices or a contest. A user can see these messages upon logging in, and you can even customize them to have different start and end dates.
NOTE:Certain features about this notification system can change slightly depending on the theme you are using. With the default theme, an active site notification displays in the AnswerHub User Interface (UI), at the top of the side panel.

Create Site Notifications
To create site notifications, follow these steps:
- On the Site Notifications page, click the ADD NEW button.
- The system will direct you to the "Create Site Notification" page to enter the information for your notification.
- Fill out the Headline, Body, and Link text fields, choose a file to include an image, select a start and end date, and select the Active checkbox as follows:
a. Headline: Here you enter the headline you want to display at the top of the site notification.
b. Body: Here you enter the content you want to display in the main body of the site notification.
c. Image: Click the CHOOSE FILE button to select an image that will display with the site notification. If you are adding an image, you may limit the size of the images that may be used through the max size image control as shown in the image of the site notification control panel above.
d. Link: To add an external link, be sure to add the complete address of the destination site. If you leave "http://" out of the external link, the site will attempt to navigate to an internal site with that name.
For Example: If you add a link to dzone.com, instead of http://www.dzone.com, then when a user clicks the headline, the system will navigate them to www.\[youranswerhubsite].com/dzone.com.\ e. Start Date: Select the date you want the site notification to begin displaying.
f. End Date: Select the date you want the site notification to stop displaying.
g. Active (checkbox): Selecting the Active checkbox to make the site notification active.
Important Note About the Active Checkbox:Even if the current date is within the set date range, if you don't check this box, the site notification will not display.
- Click the SAVE CHANGES button to save your changes.
A successful save results in a green bar at the top of the page with a message that reads "Successfully added new site notification."
Edit Site Notifications
To edit a site notification, click the EDIT NOTIFICATION button, the pencil icon. You can edit any of the fields described in the create site notifications section.
Activate or Deactivate a Site Notification
- To activate a site notification, click the INACTIVE button.
A successful activation results in a green bar at the top of the page with a message that reads "Successfully activated site notification" and the INACTIVE button displays as the ACTIVE button. - To deactivate a site notification, click the ACTIVE button.
A successful deactivation results in a green bar at the top of the page with a message that reads "Successfully deactivated site notification" and the ACTIVE button displays as the DEACTIVATE button.
Delete a Site Notification
- Click the trashcan icon.
A successful deletion results in a message in the browser window that reads "The page at [youranswerhuburl]." - Click the OK button.
A successful save results in the notification no longer displaying on the table, and a green bar displays at the top of the page with a message that reads "Successfully deleted site notification."
Updated 3 months ago
