Chat Integrations
Chat Integrations
AnswerHub includes a Chat Integration Framework that allows up to three messaging systems to be connected at one time. Each integration supports mapping of spaces and topics to channels and may be configured to allow either one way announcements of new AnswerHub content onto mapped channels or two way communication that allows questions to originate from channels and for replies to announced content to be passed into AnswerHub as Answers and Comments. Content posted in AnswerHub that originated on a messaging channel will be marked with an icon representing that messaging service for easy identification of the community. The content overview advanced analytics provides a source type filter for questions, answers and comments so events for these content types can be tracked as those that originated in AnswerHub or from a connected messaging integration to see how the integrations are being used to improve content growth and user collaboration. Some messaging integrations may also provide the ability for users to configure and receive their AnswerHub content notifications through the connected messaging system. This capability is currently supported on the SLACK integration and is planned future feature for TEAMS.
As the corresponding plugin for each messaging system is enabled, the control panel for that service will appear as a tab on chat integrations admin page. Each system will require some configuration of the AnswerHub bot on the messaging system, and the steps to complete this vary depending on the messaging system.
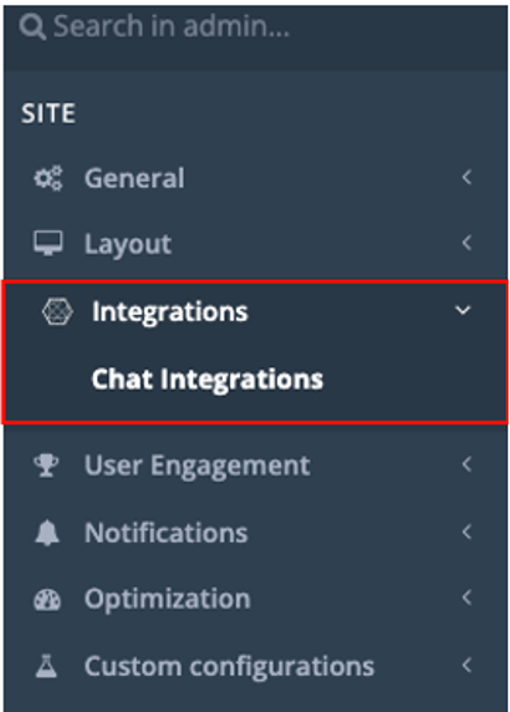
Chat integrations were initially introduced in version 2.23.0 of AnswerHub. If the chat integrations page is blank, then no integration plugins have been enabled. To resolve, navigate to the manage plugins page, select disabled plugins tab, and look for the available messaging integration plugins such as Slack V2 and TEAMS. Note: To manage plugins, the user must be a member of the Network Administrator group or have the Site Owner permission otherwise granted.
Slack Integration
To enable the SLACK integration, locate the Slack Integrations V2 plugin from the disabled plugin list and click the enable button. Note: A prior Slack V1 plugin remains available in AnswerHub through 1Q22 when it is planned to be sunset.
Planned Sunset of Slack V1 pluginThe Slack V1 plugin remains present in AnswerHub through 1Q2022 when it is planned to be sunset as obsolete since the V2 plugin provides all functions in V1 in addition to the many new feature and capabilities. The V1 plugin is configured with a different control panel location and may not be enabled at the same time the V2 plugin is enabled. Configuration information for Slack V1 plugin

Once the Slack V2 plugin is enabled, return to the integrations page. The messaging integration supports up to 3 concurrent messaging systems connected to AnswerHub which will each appear on a separate tab on the chat integrations page. Here, the Slack Integration is shown:
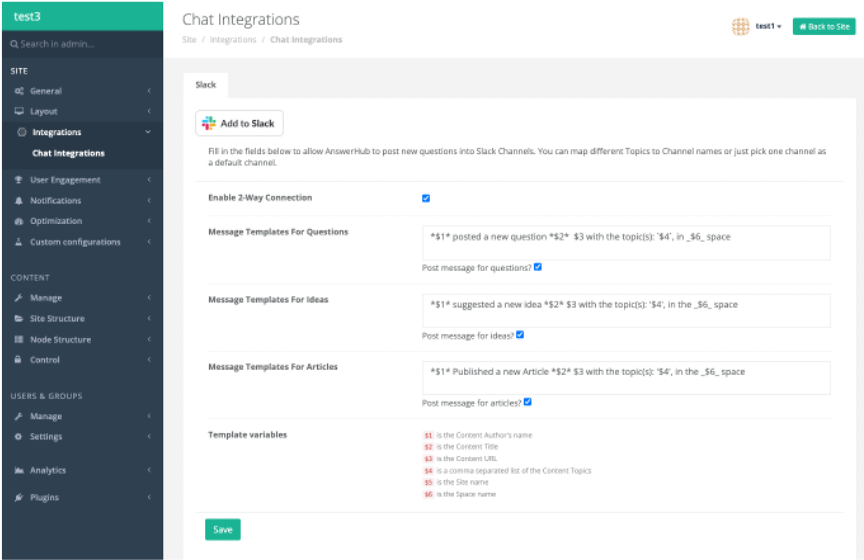
To begin configuration, ensure that you have administrative rights in slack to configure the workspace you wish to connect to Answerhub. Click that workspace to make it the active workspace on Slack. Then, click the Add to Slack button in AnswerHub. Only one workspace may be connected to AnswerHub at a time.

After clicking the slack button a workflow will present that enables you to complete the connect. Verify that the correct Slack workspace is shown, and then click Allow. If the correct workspace is not shown, select cancel and then check Slack to see that the correct workspace is active and that you have administrative permissions for this workspace and then re-attempt the connection.
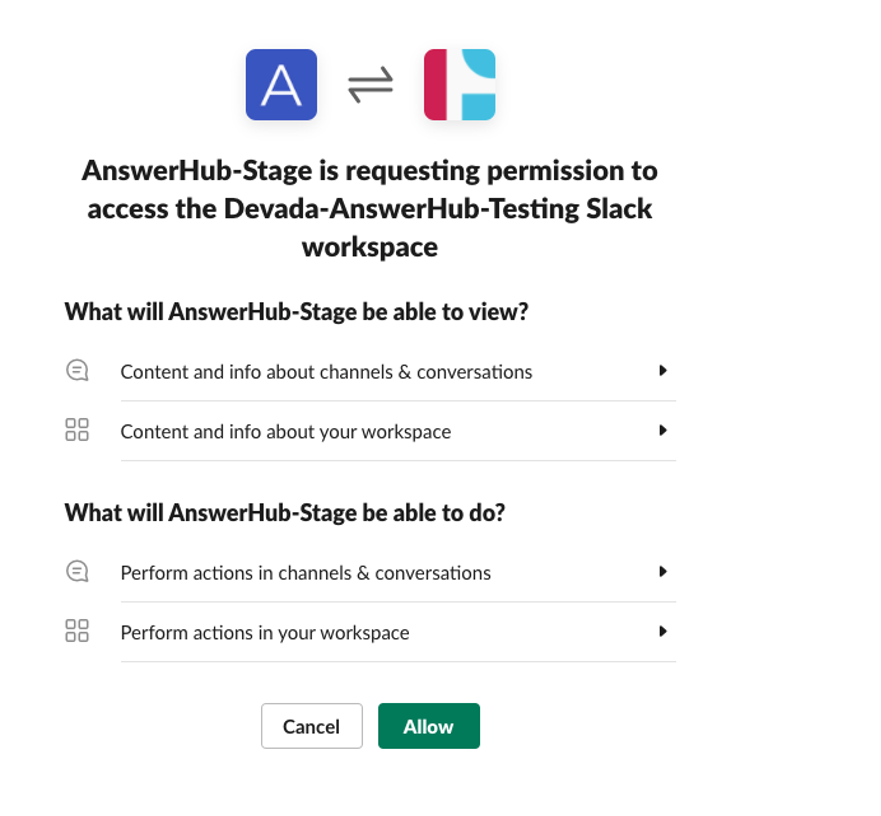
Once the workspace is mapped, proceed with configuration of the integration:
If you wish to announce new Questions, Ideas, Articles that are published into Answerhub onto specific channels, first check the box for each content type you wish to enable and construct the announcement template in the associated box for each content type. You may customize the announcement using free text and interspersed template data variables as shown in this example:
If you wish for users on the messaging system to be able to reply back, and to originate questions from the messaging system, also check the box to enable 2 way connection.

Click Save once you have completed the templates.
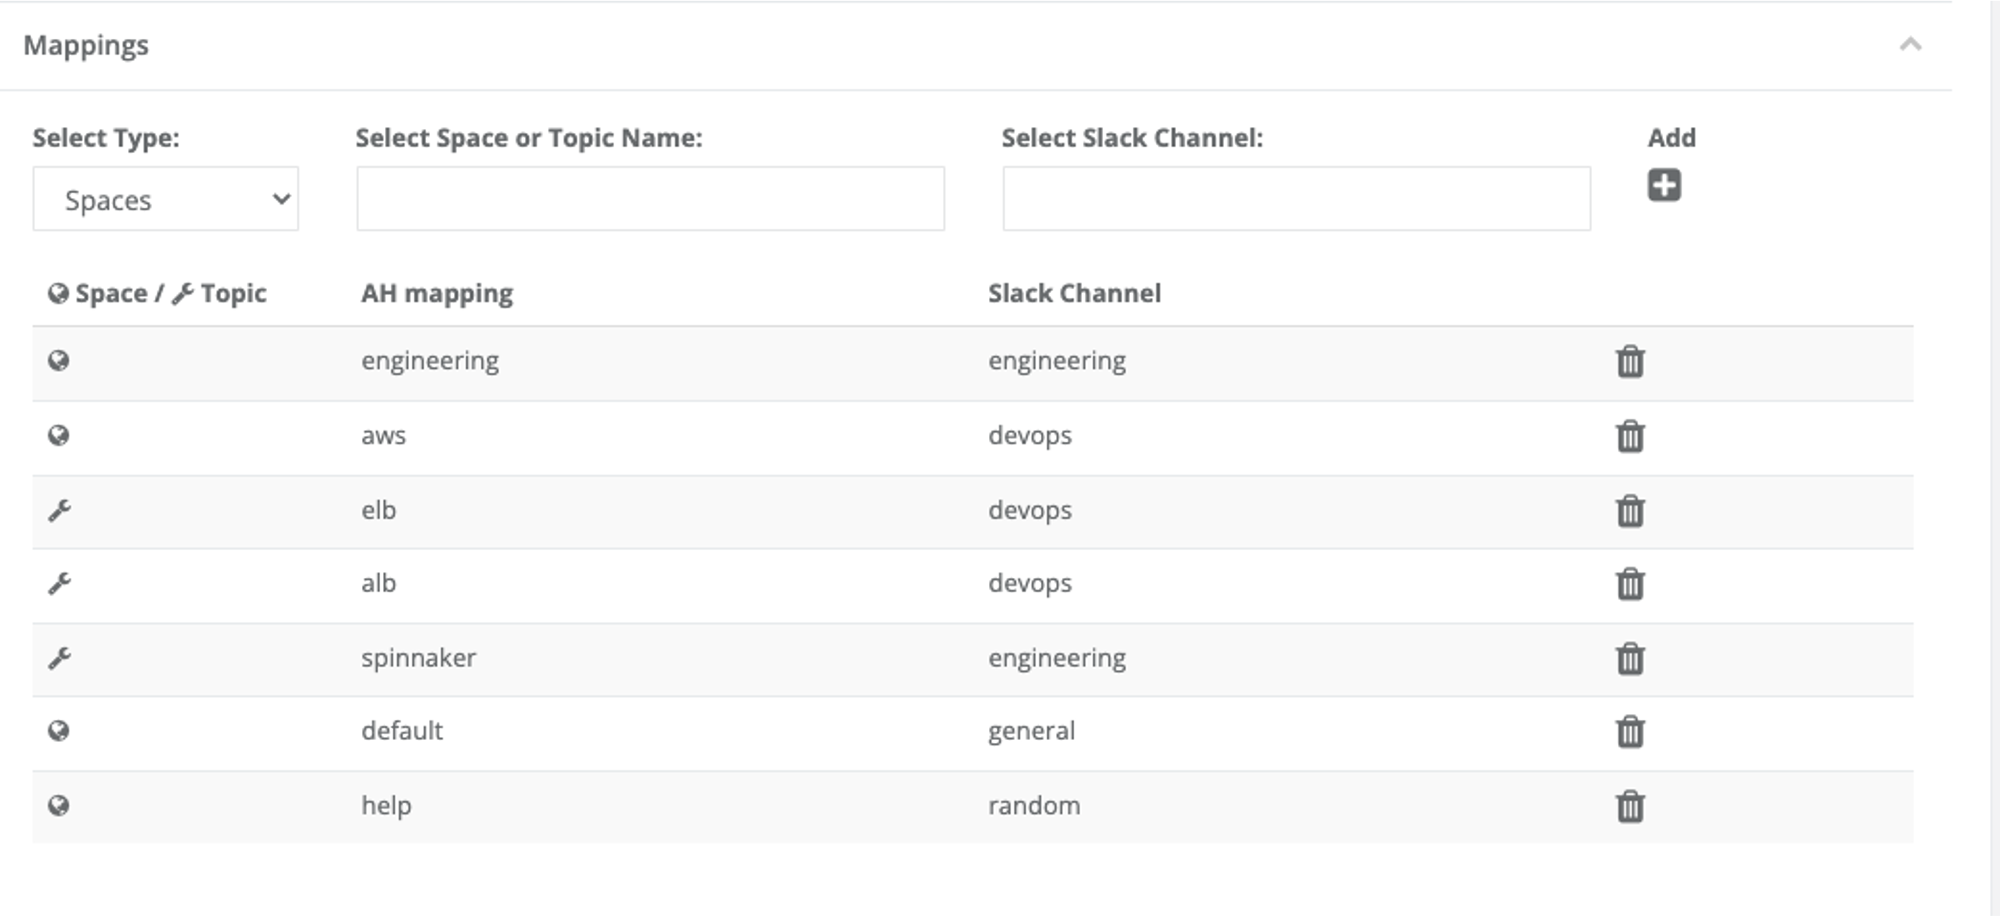
Now move on to mapping. You may map spaces to channels 1:1. When content of the types enabled in the previous step is published on a space mapping to a channel, the announcement is made on that channel. When a question is asked on that channel using /AH ASK then it will be posted in the mapped space. Only one channel should be mapped to each space.
Topics may also be mapped to channels and multiple topics may be mapped to the same channel. If new content is created with multiple topics that are mapped to different channels, the notification will be published on each channel. If multiple topics and a space are mapped to the same channel, the system will not duplicate notifications when the content is posted.
To create a new mapping entry, select either space or topic from the selector at the left and start typing the name of the space or topic in the selector box. Answerhub will present a list of spaces or topics that match the characters you are typing. Click to select the topic or space from the matching list. Now, select the slack channel to map to by typing the first few characters of the name of the channel you wish to map in the select channel box and select the desired channel from the list of possible matches returned. Now click the add button. Repeat until you have set up the matches. It is recommended that communities begin by mapping spaces to channels and then selectively add topics as necessary - this will reduce noise / confusion during the initial deployment. As the community becomes more comfortable with interactions, then consider adding topics where other channels might want to be informed of discussions on specific topics. Use the trashcan Icon to remove unwanted / obsolete mappings. Click save before leaving this page so that the changes may take effect.
Current Limitations and ConsiderationsThe lookup of space names currently depends upon the existing space name plug that is shown in the URL when clicking the breadcrumbs for that space in the front end UI. If an admin has renamed a space, the space name shown on the drop down menu and in the manage spaces in the admin will not be the same as the original name plug when the space was created. If you are having trouble getting the desired space name to show up in the space selector, check the correct plug name for the space on the front end and begin typing that and it should be offered in the list of matching spaces.
This integration currently allows connection to open channels that are indicated with the hash sign on Slack. Channels that are private and include the lock icon will not be shown in the lookup. It is possible to manually type the name of the locked channel and add the connection, but the integration will not function as expected and submissions through the /AH ASK modal will not publish through to AnswerHub.
AnswerHub is evaluating solutions to these limitations for future release.
When the 2 way feature is enabled, threaded replies posted on the messaging system in response to a question originating on the messaging system will be added as answers to that question in AnswerHub. If the messaging user identity can be matched by email to a user in AnswerHub, the answers will be attributed to that user in AnswerHub. If the match cannot be made, then the messaging bot persona is used to anonymously post the Answers in AnswerHub.
Similarly, if a new question is originated on the messaging system and the email can be matched, the question will be posted in AnswerHub using the Answerhub account that corresponds to the user. If the match is not made, then the messaging bot persona is used to post the question in AnswerHub.
Updates in 2.24.0 ReleaseUpdates in the Slack Integration V2 delivered in 2.24.0 allow threaded replies to new questions, articles and ideas that originated in AnswerHub and were announced on the messaging system to be received and added as Answers (for questions) and Comments (for Ideas and Articles).
Due to the opportunity to have announcements of new content occur on multiple channels based on the space and topic mapping rules, it is possible that there will be multiple sets of threaded replies on the different channels. All replies will be stored in Answerhub, along with Answers and comments which originated in AnswerHub. The threaded conversation on each channel instance would reflect both the replies that originated on that channel and the native AnswerHub replies. Synchronization of replies between messaging channels will not be possible.
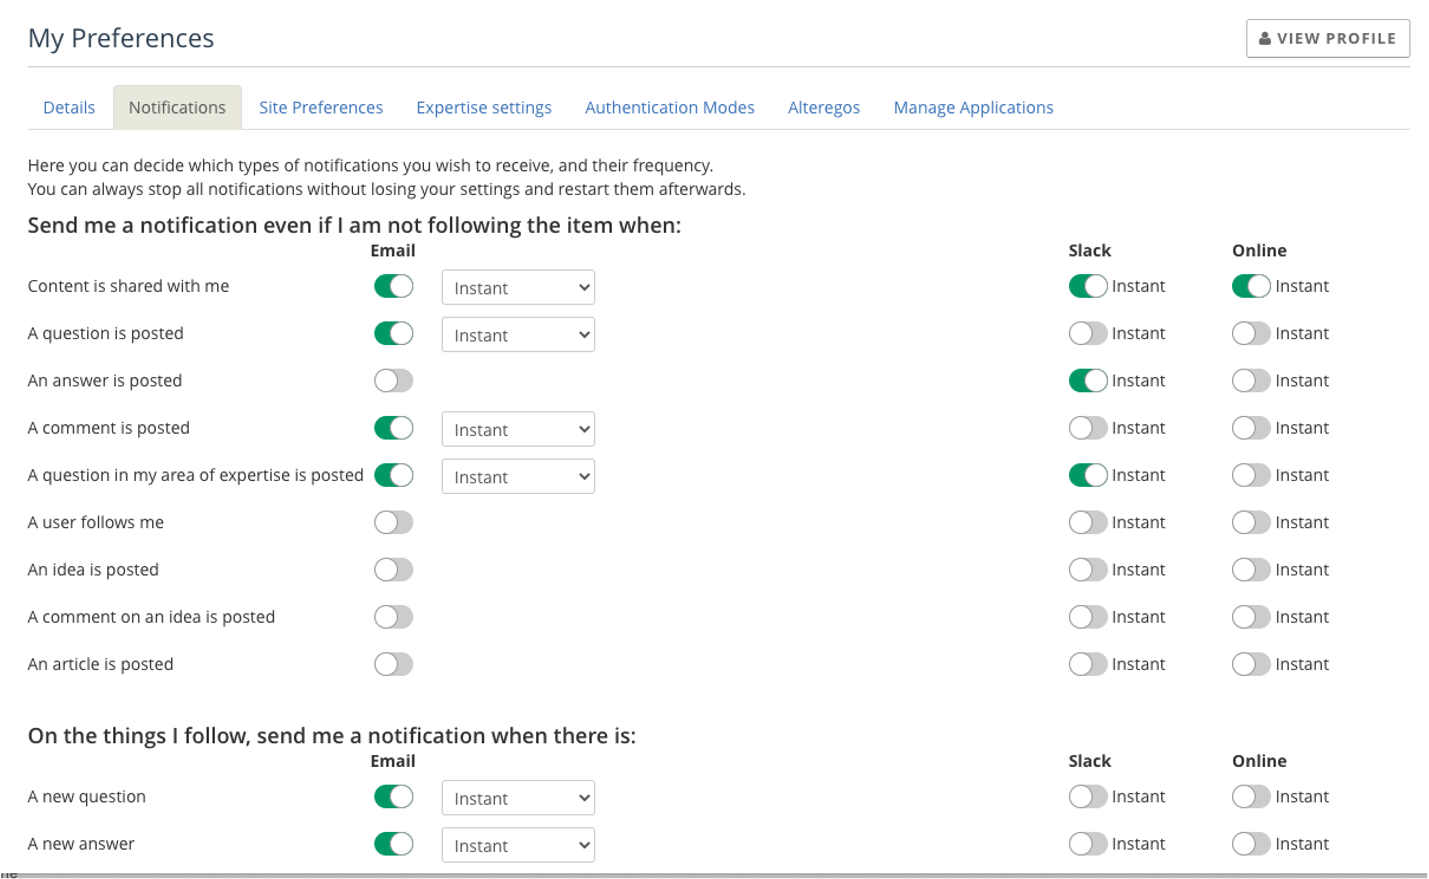
The Slack V2 integration also provides the ability for users who have AnswerHub accounts matched to their Slack accounts (connection is automatic and matches by email address) to receive their individual notifications about activities in AnswerHub on Slack in addition to the other notification options for email, and online in AnswerHub. The user can customize these settings through the notifications tab on user preferences, making selections in the Slack column.
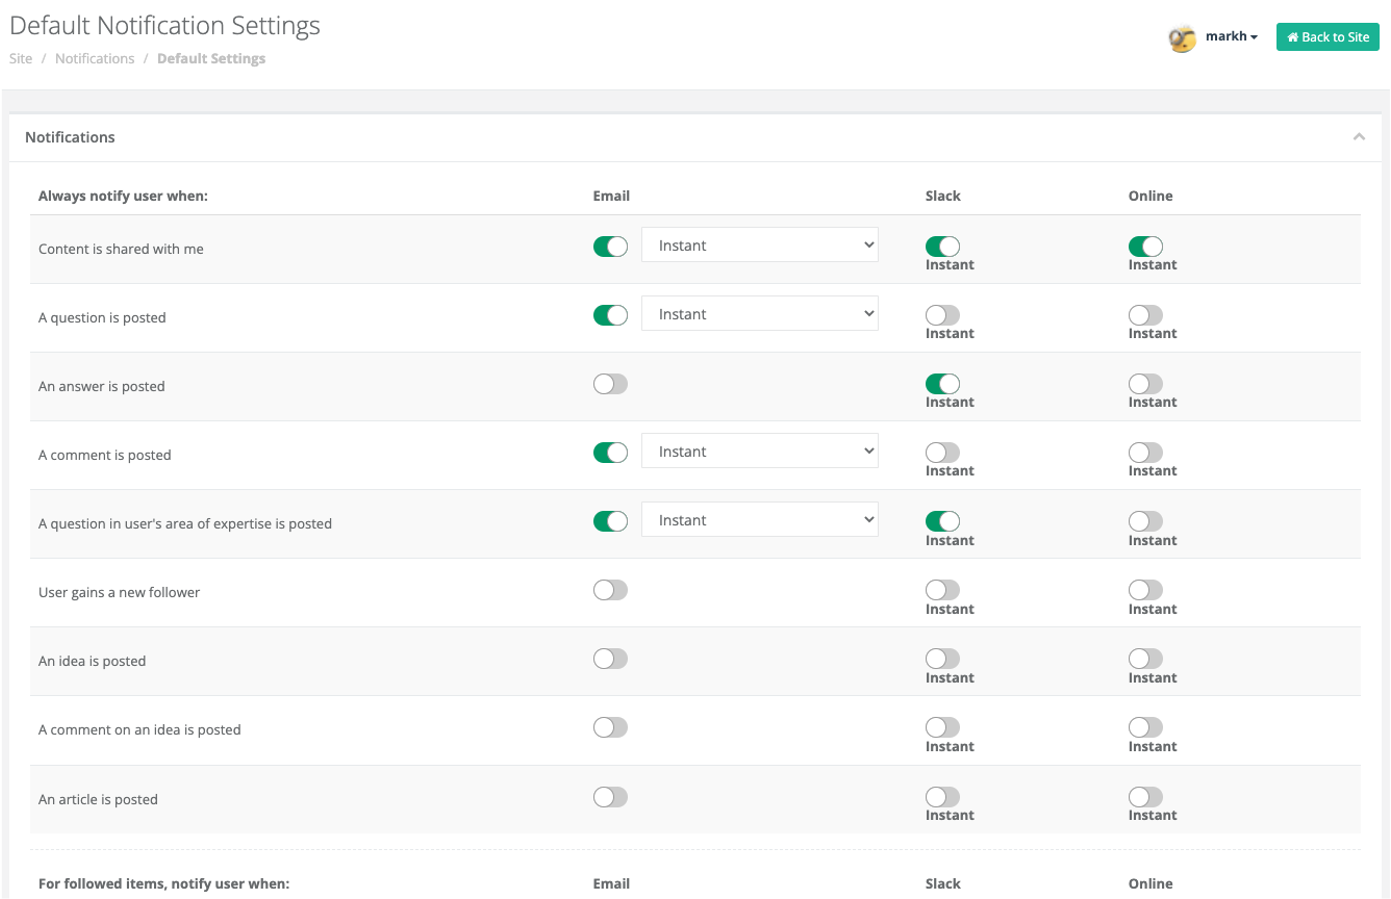
Similarly, the admin may also configure what types of notifications all connected users should receive via Slack in the admin control panel for notifications -> default settings. Individual changes that users make in their preferences will override these settings. If the admin wishes to force a change for all users, they may configure all settings on this screen to be a new set of defaults, then click the button to update settings and then Reset all user notification preferences. If the reset is not performed, then changes to settings for Slack will be applied for new users or where existing users have not previously updated their notification preferences only.
Teams Integration
The TEAMS integration requires the setup and registration of an Azure bot, connection of the bot to Microsoft Teams, upload of the AnswerHub custom app, enablement of the Teams integration plugin, and configuration on AnswerHub of the application client ID, Directory ID, and Application Secret.
Setup / Register an Azure Bot
This first step consists of initially creating an Azure Bot resource, which will allow you to register your bot with the Azure Bot Service. Here are the steps:
- Go to the Azure portal.
- In the right pane, select Create a resource.
- In the search box enter bot, then press Enter.
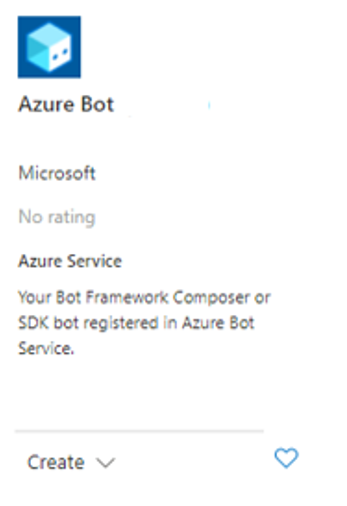
- Select the Azure Bot card.
- Select Create

-
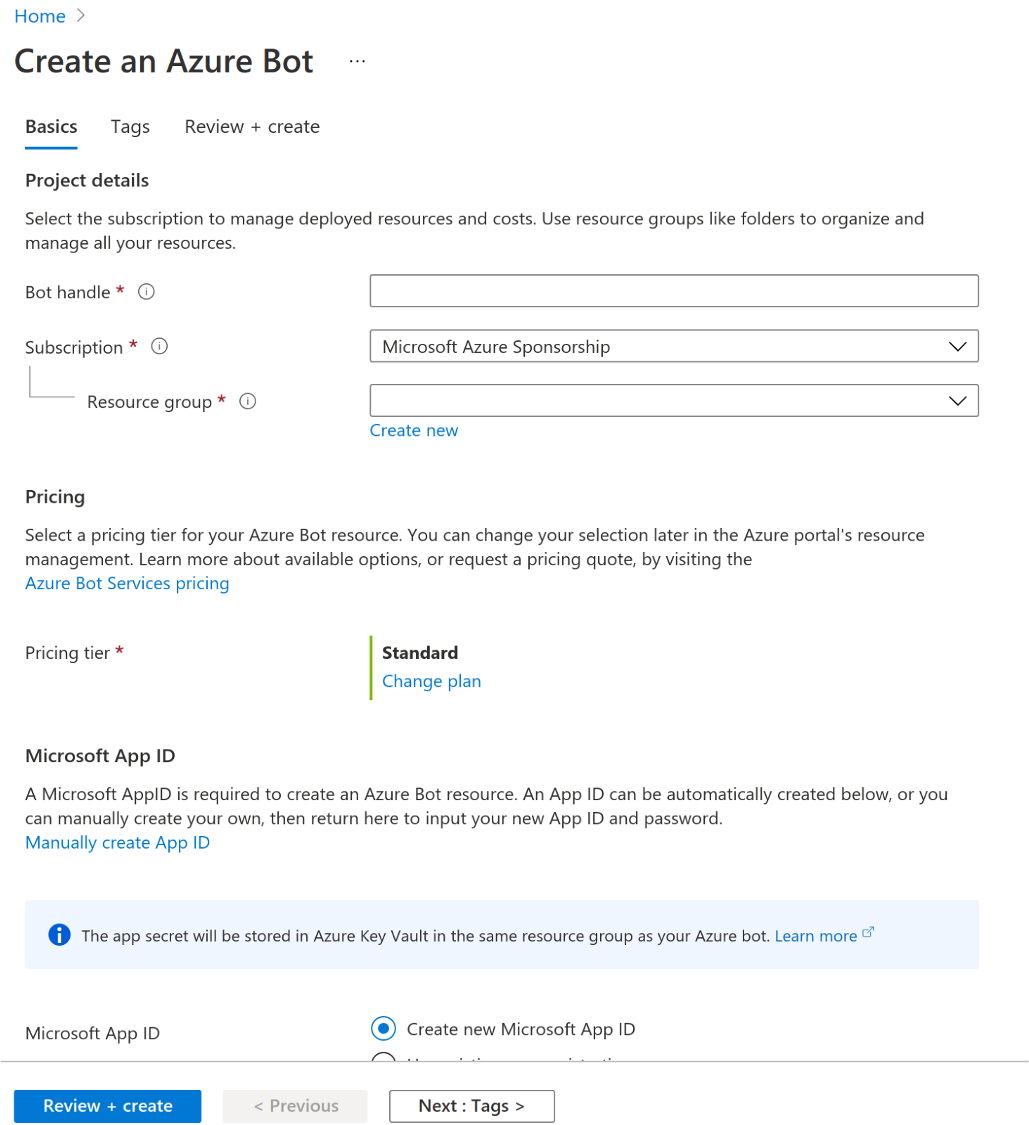
Enter the required values. The following figure shows Create new Microsoft App ID selected. ( https://portal.azure.com/#create/Microsoft.AzureBot )
-
Select Review + create.
-
If the validation passes, select Create.
Bot Configuration
When Azure creates the Azure Bot resource, it generates an app ID and a password. Then, as a final step, keep in mind, we will need the Azure bot resource app ID and password to configure the bot for deployment.
Below is the list of the Configuration fields:
Messaging Endpoint - The endpoint to communicate with your bot. Example URL format: https://<answerhub-base-url>/api/messages
Microsoft App ID - Unique identifier for your bot. This value cannot be changed. You can generate a new password by clicking on the Manage Link.
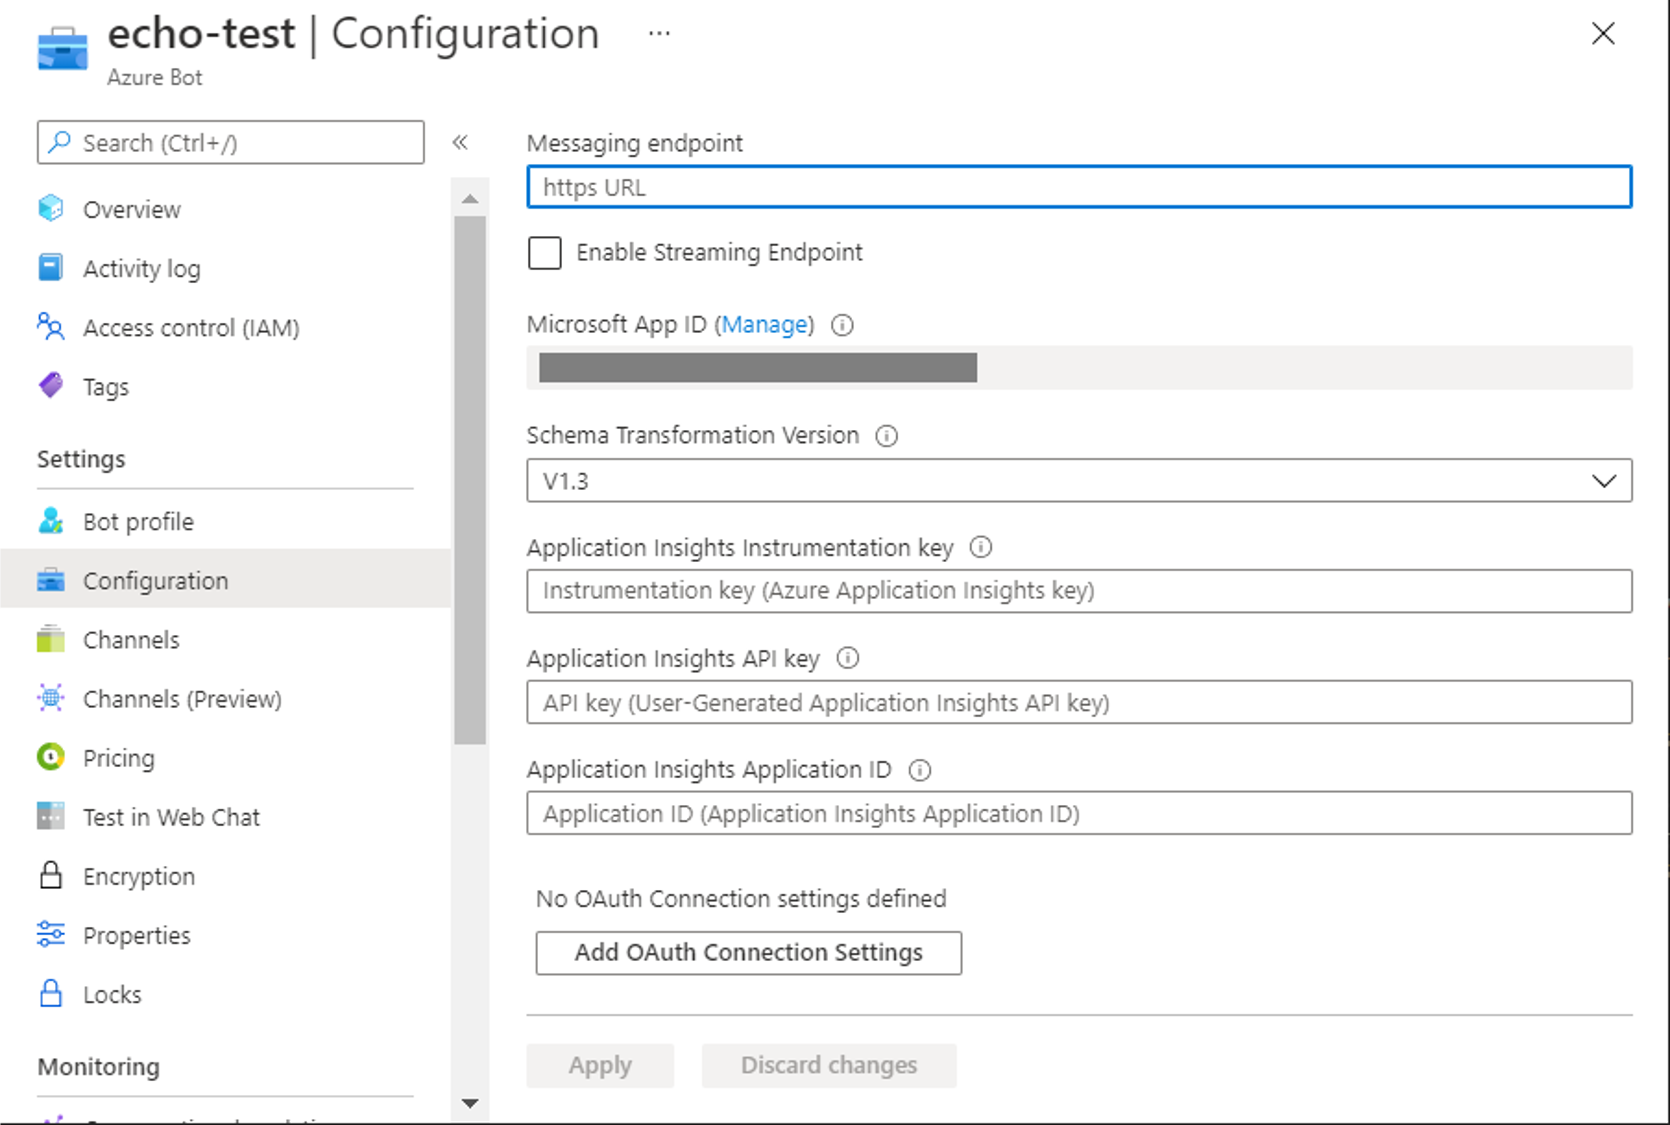
Obtain Registration Password/Secret:
An Azure Bot resource has an application ID (app ID) and a password/secret associated with it. The Azure Bot Service assigns a unique application ID to the application. You can obtain the password/secret following the steps described below.
- In your browser, navigate to the Azure portal.
- In the resource list, click on the registration application name.
- In the right panel go to the Bot Management section and click Settings. The registration application Settings page will display.
- Select the Manage link next to Microsoft App ID.
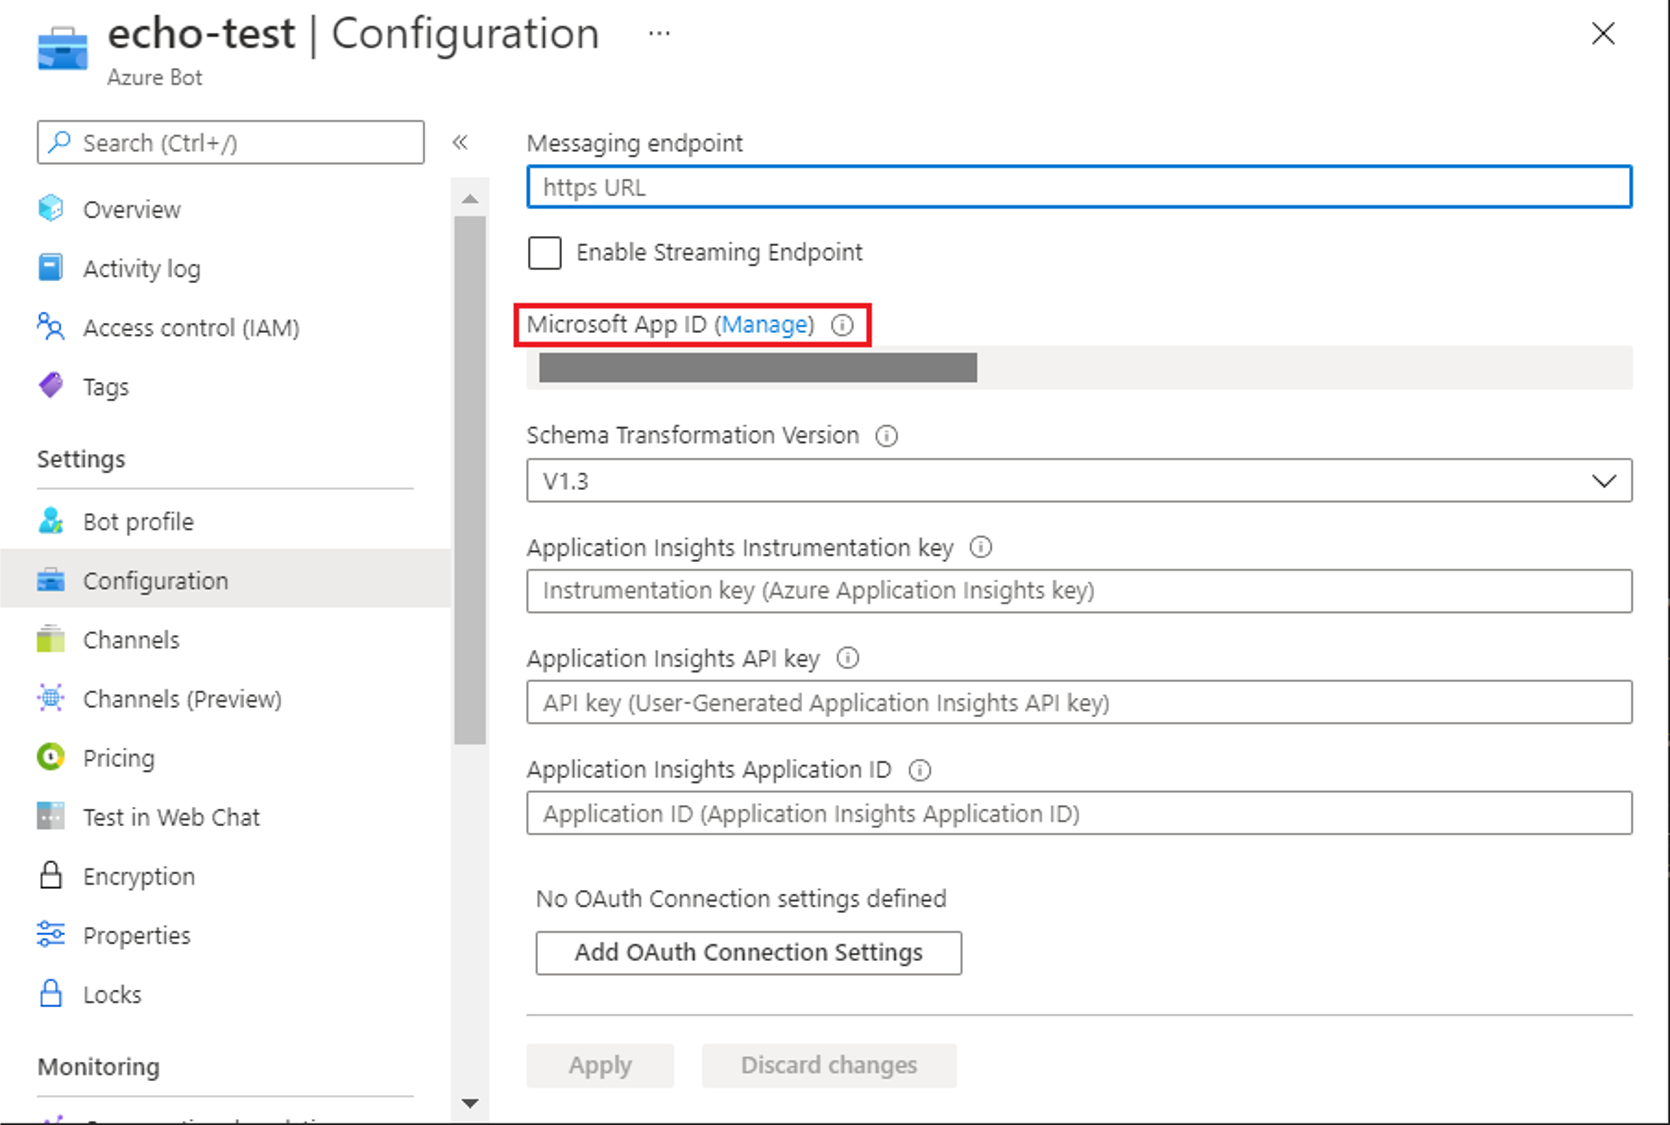
Now, In the Certificates & secrets pane, click the New client secret button.

Next, add the description, select the expiration time based on your needs (1, 2 years or never) for your Azure Bot, and click the Add button. Choose an expiration based on your IT policies.
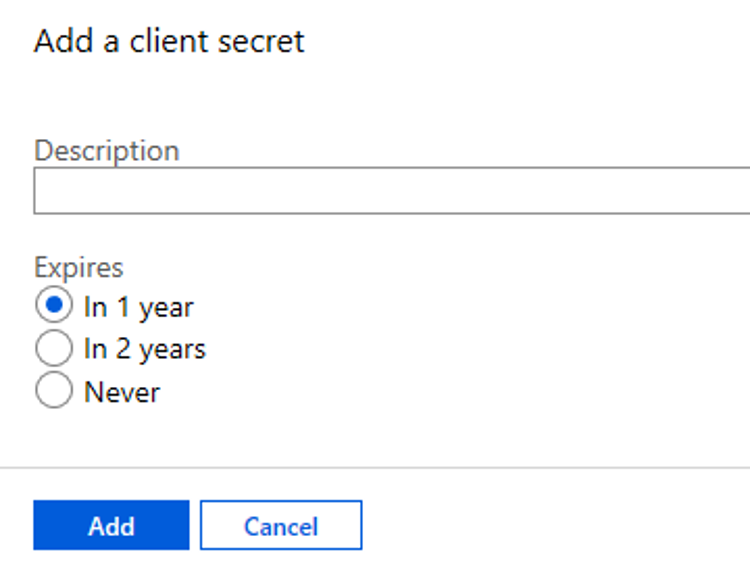
Important Note on SecretThis will generate a new Secret for your bot. Copy this password and save it to a file as it will be needed short. Note - This is the only time you will see this Secret. If you do not have the Secret saved, you will need to repeat the process to create a new password/Secret should you need it later.
API Permissions
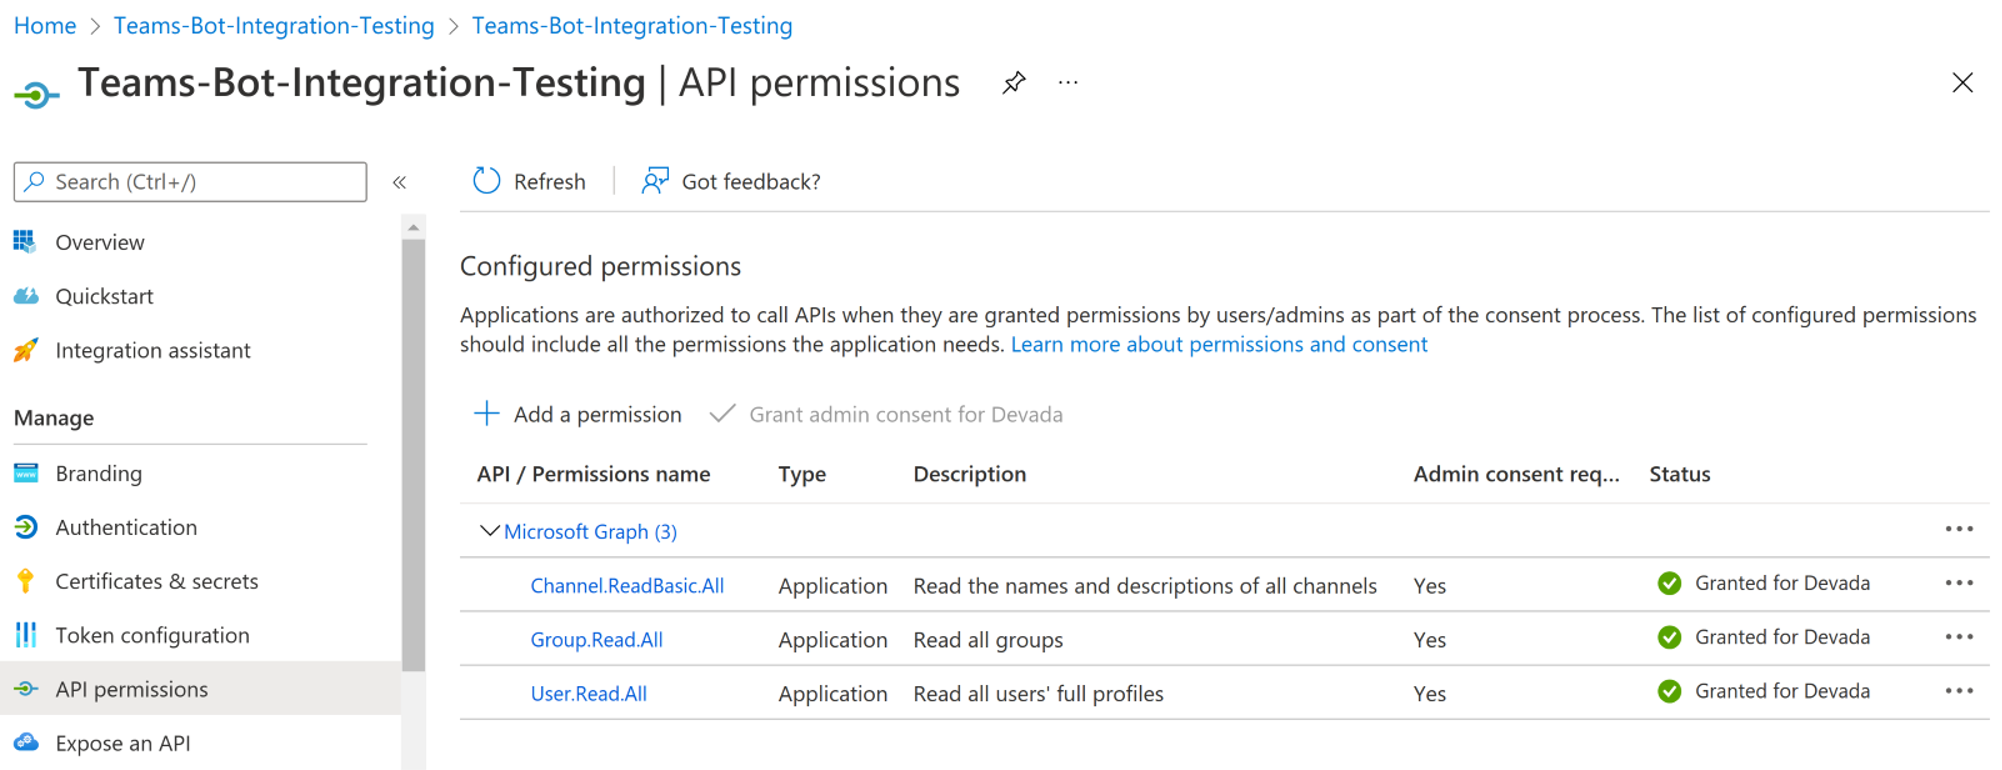
On this section, for the Azure bot setup, is needed to setup the API permissions:

Now select Microsoft Graph (as shown on above screenshot), in order to set 3 Application permissions as shown in the example below:
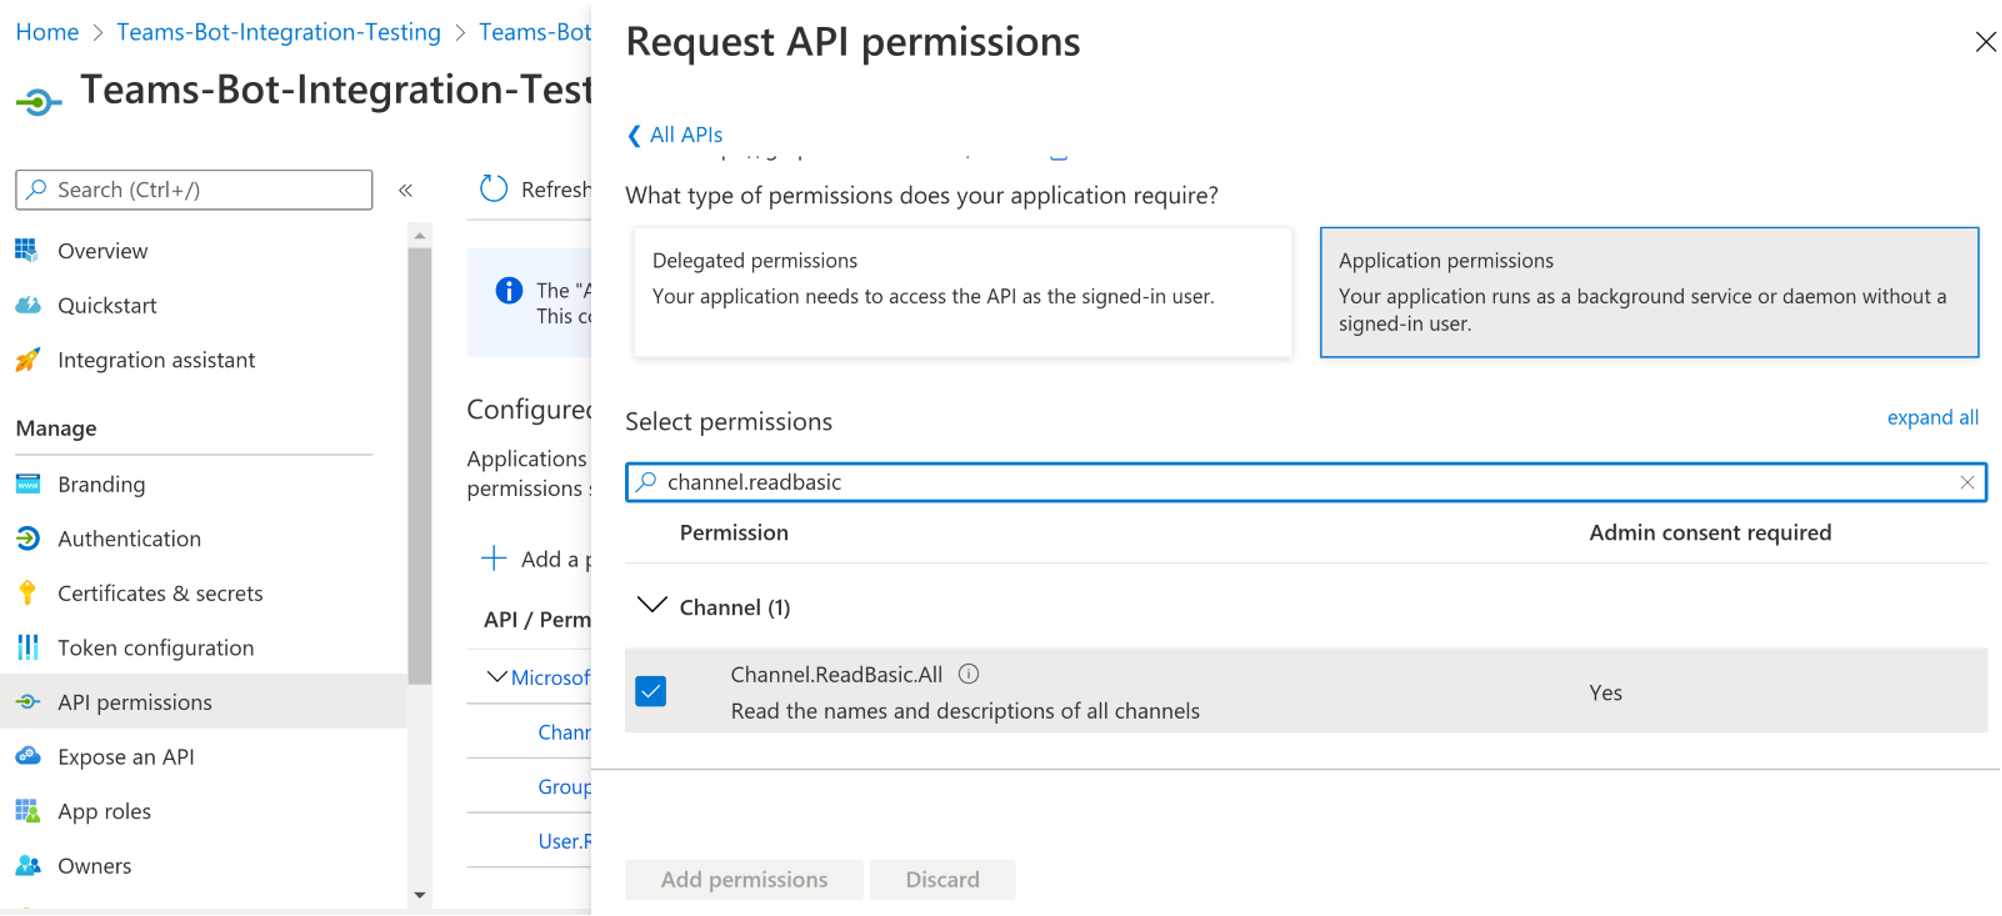
Set permissions for:
- Channel.ReadBasic.All
- Group.Read.All
- User.Read.All
These are required to retrieve channel info and user email credentials (to map to corresponding user profile in AnswerHub) so that we are able to identify who posted a message and on which channel.
Microsoft Docs References: [https://docs.microsoft.com/en-us/azure/bot-service/bot-service-quickstart-registration?view=azure-bot-service-4.0&tabs=java, https://docs.microsoft.com/en-us/azure/bot-service/bot-service-manage-settings?view=azure-bot-service-4.0#configuration](https://docs.microsoft.com/en-us/azure/bot-service/bot-service-quickstart-registration?view=azure-bot-service-4.0&tabs=java, https://docs.microsoft.com/en-us/azure/bot-service/bot-service-manage-settings?view=azure-bot-service-4.0#configuration)
Now we can connect the bot to Microsoft Teams....
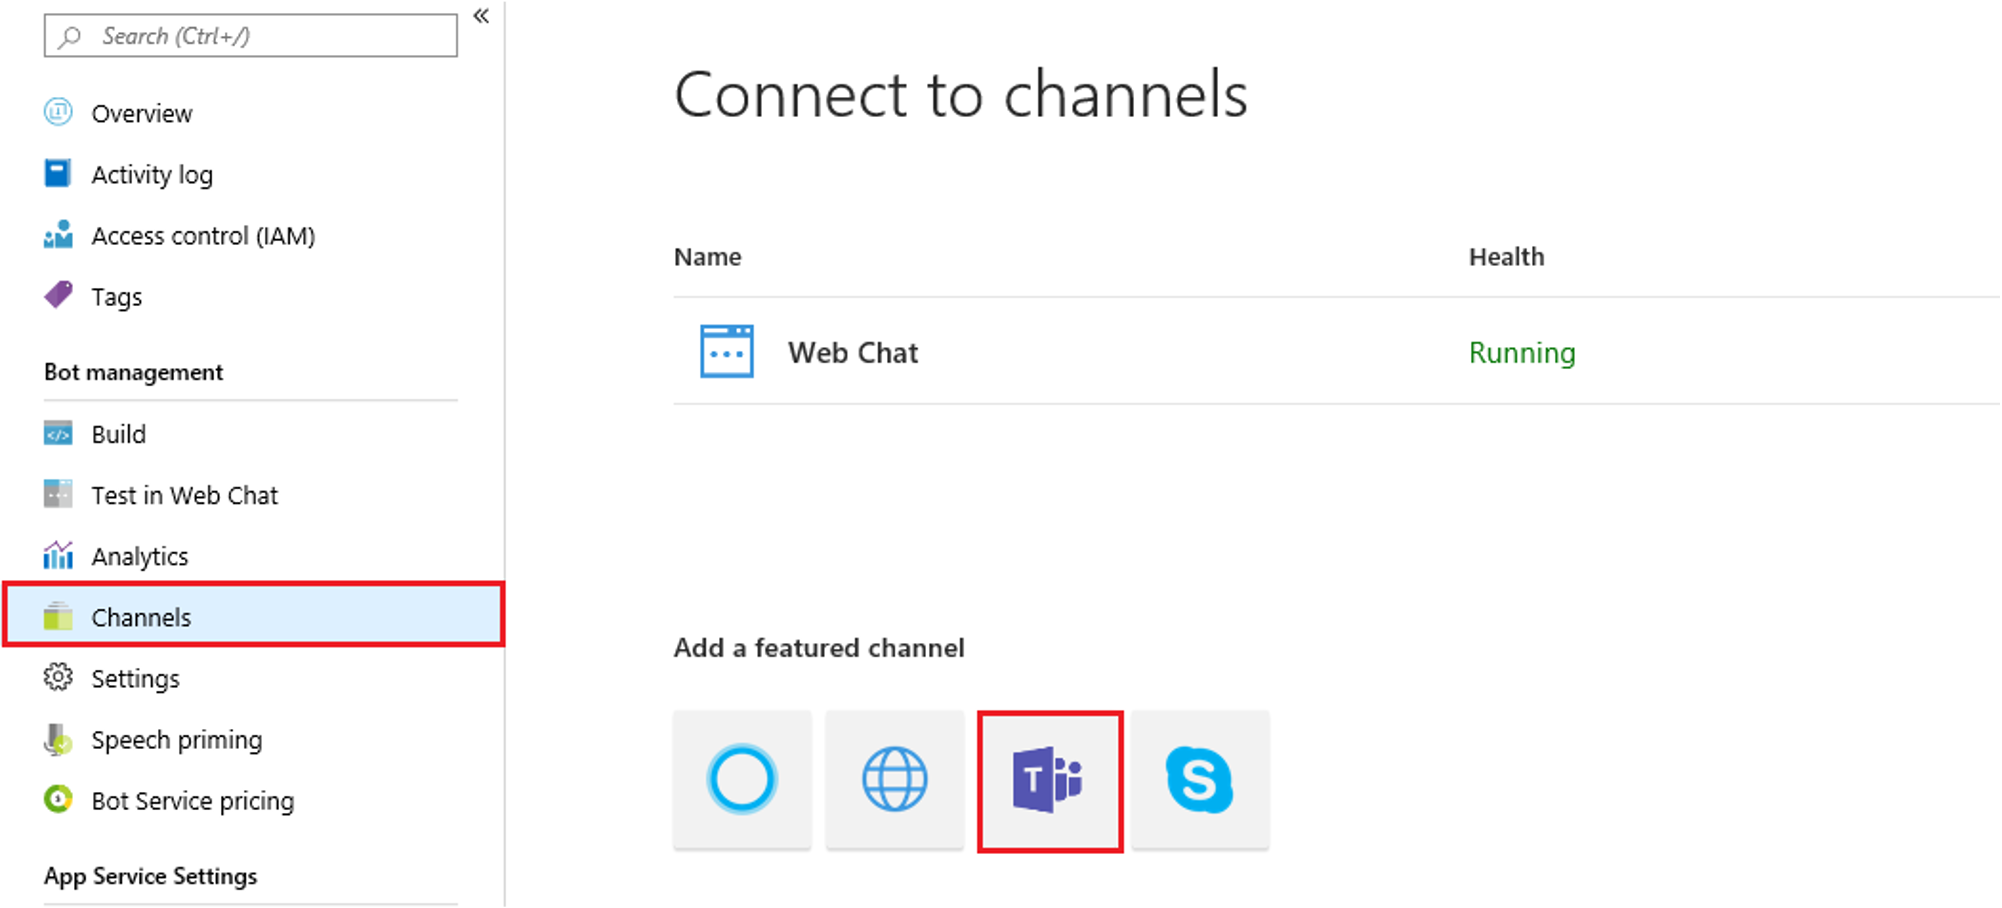
To add the Microsoft Teams channel, open the bot in the Azure portal, click the Channels link in the left column as shown below, and then click the Teams icon:
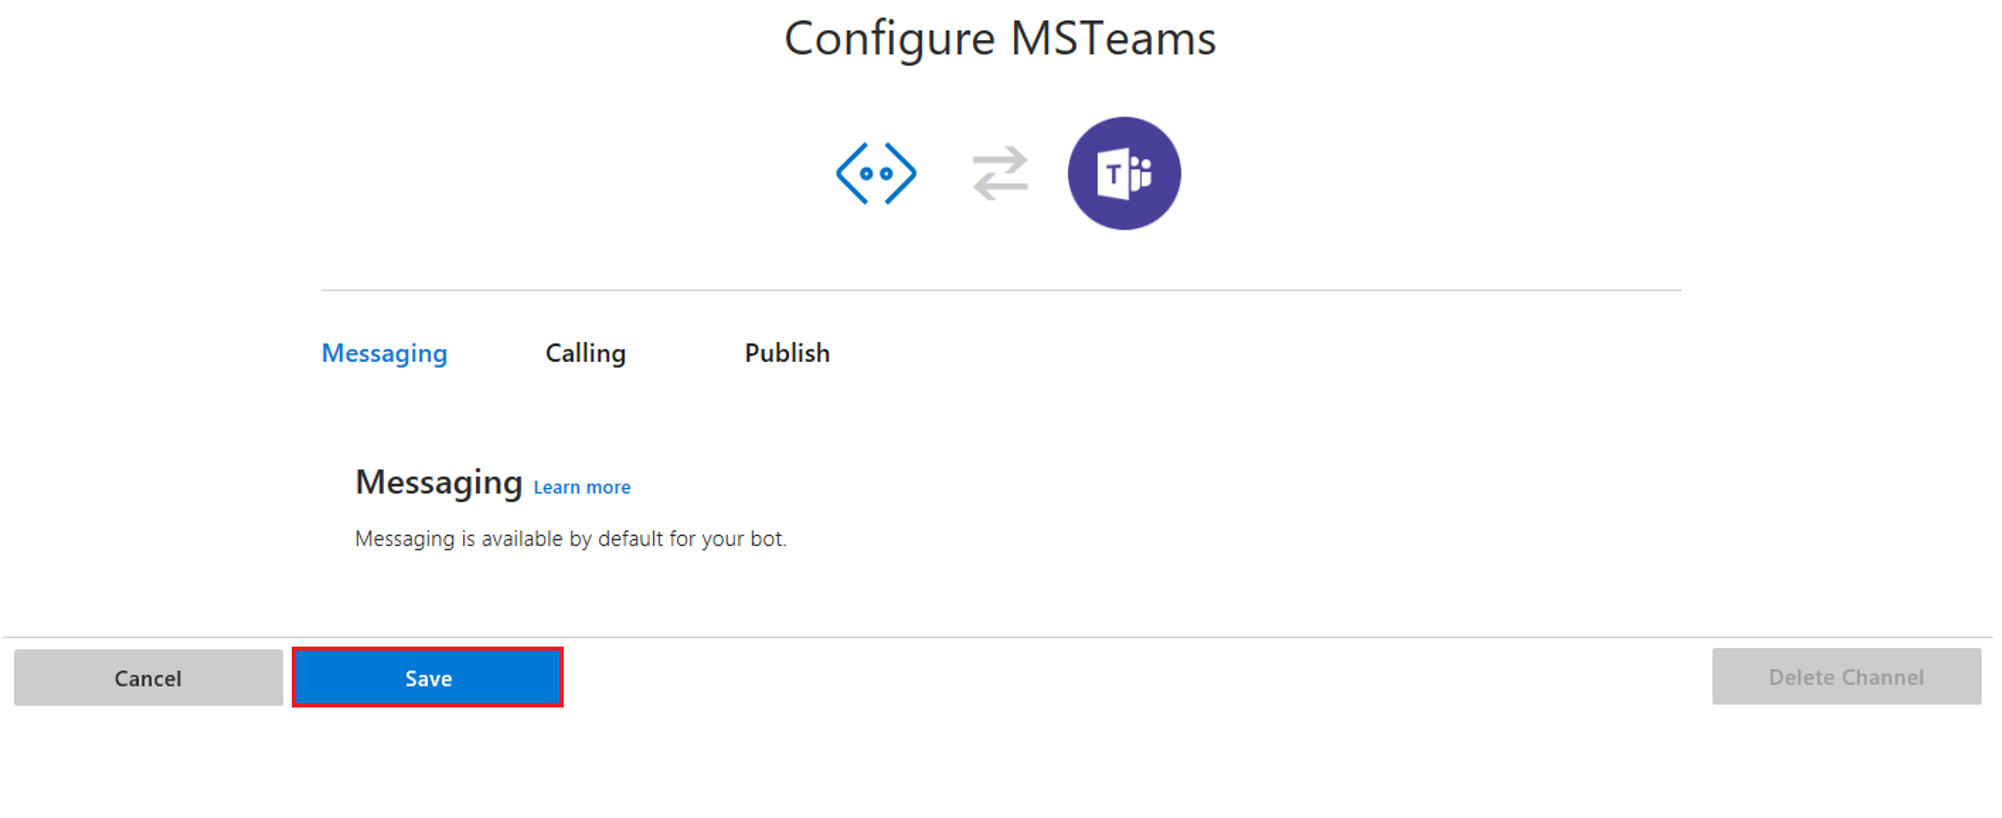
Next, click the save button...
After adding the Teams channel, go to the Channels page and click on the Get bot embed code link

-
Copy the https part of the code that is shown in the Get bot embed code dialog. For example, https://teams.microsoft.com/l/chat/0/0?users=28:b8a22302e-9303-4e54-b348-343232.
-
In the browser, paste this address and then choose the Microsoft Teams app (client or web) that you use to add the bot to Teams. You should be able to see the bot listed as a contact that you can send messages to and receive messages from Microsoft Teams.
Doc Reference: https://docs.microsoft.com/en-us/azure/bot-service/channel-connect-teams?view=azure-bot-service-4.0
Upload AH custom app on to Microsoft Teams
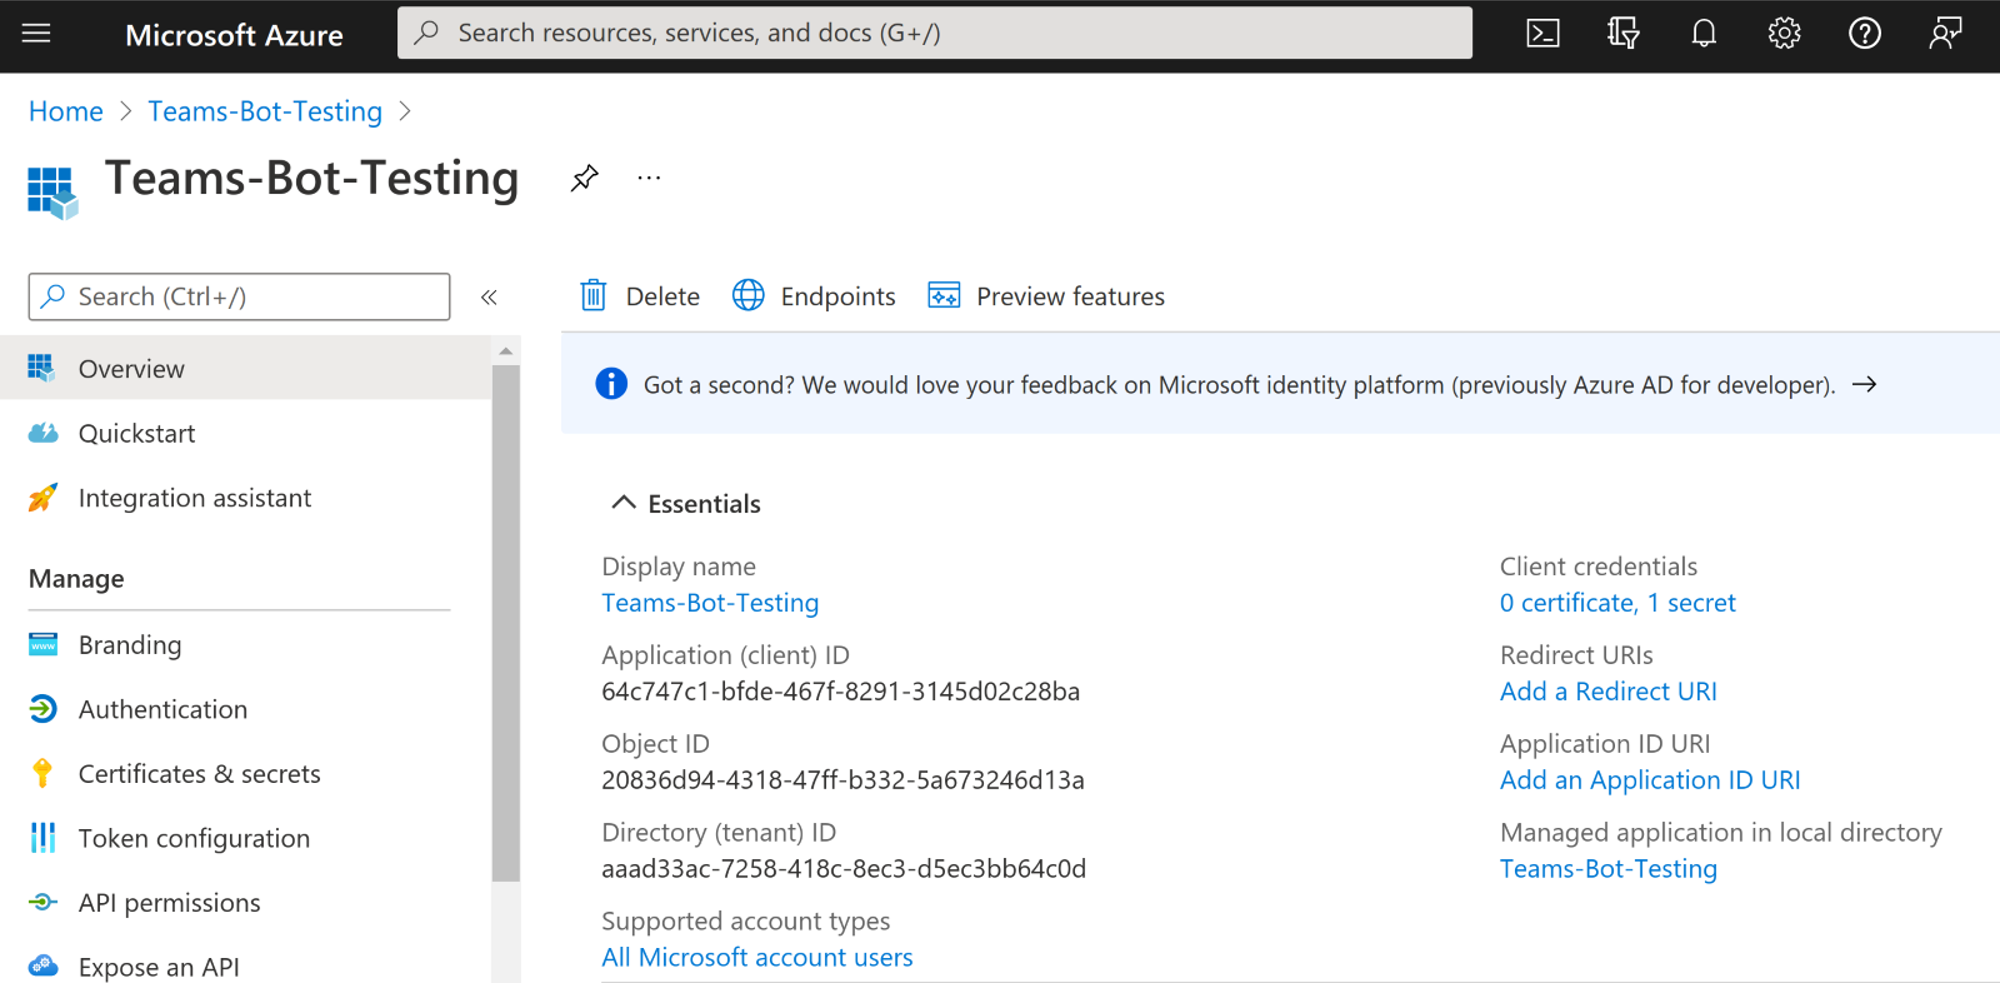
In this next set of steps, we are going to start the configuration in AnswerHub and generate a manifest file which will download as a zip file which will then be uploaded as an app on Teams. To prepare for this, we will need to collect the following information from the bot:
- Application (Client) ID
- Directory (Tenant) ID
- Application (Client) Secret
Collect these items from the Azure Bot Overview page as shown below. Here the Application (Client) ID and Directly (Tenant) ID are shown but the secret is not. You will need the secret you created and recorded earlier:
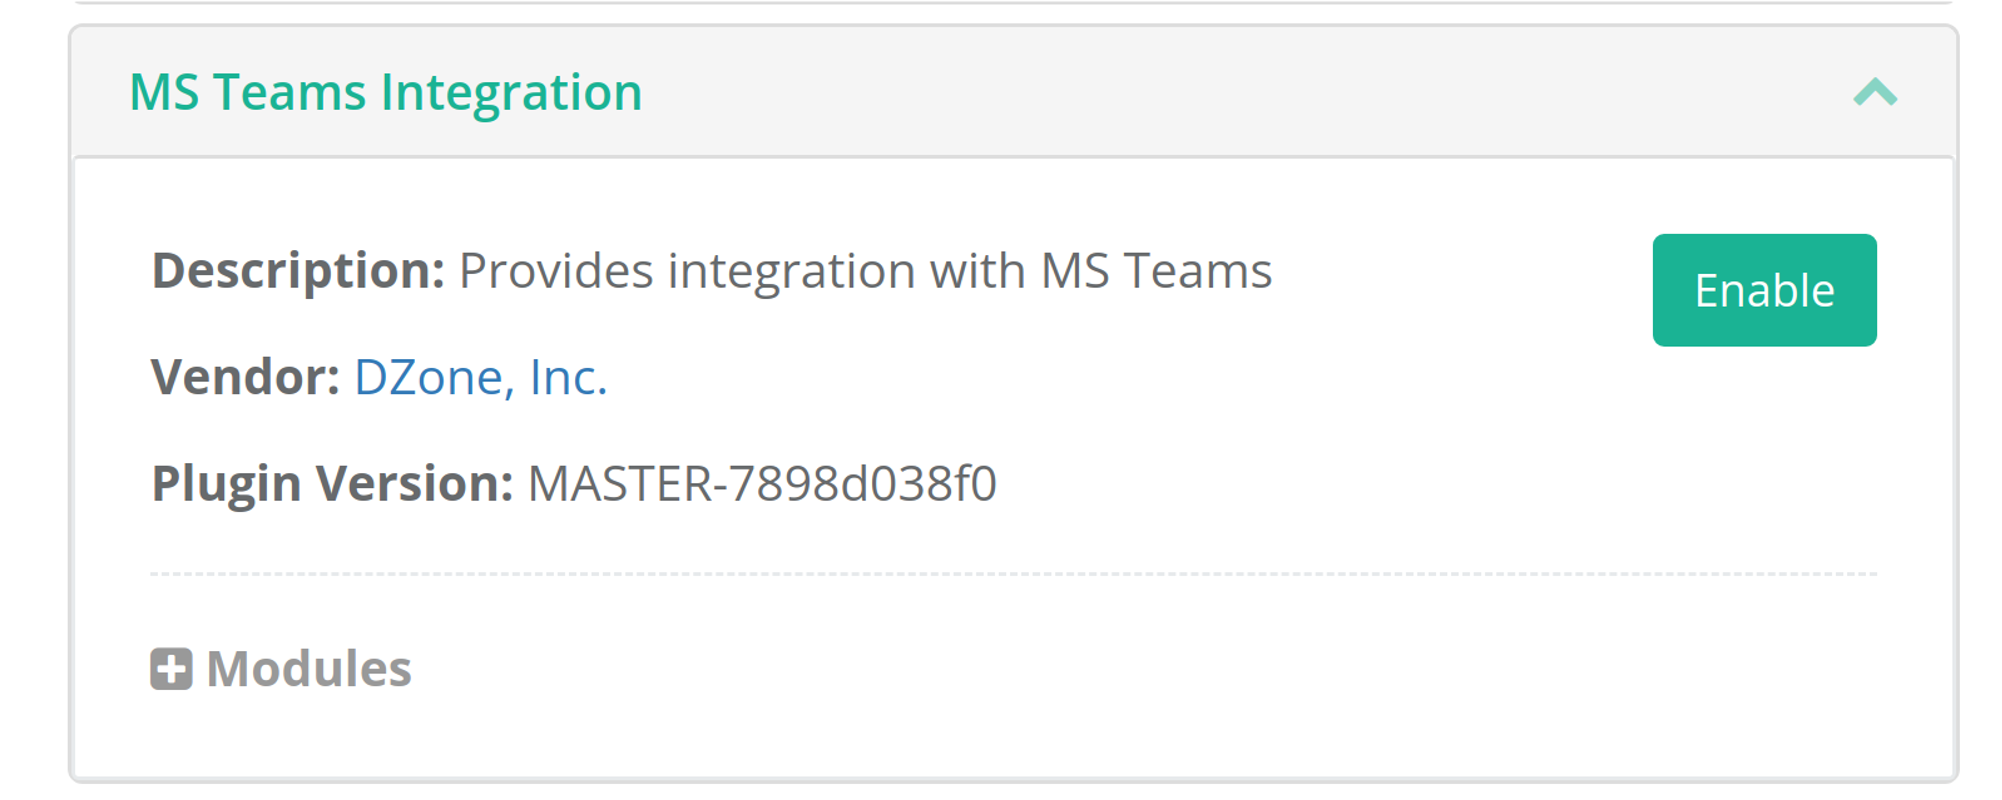
Now, log into AnswerHub with an admin (Super User) account and navigate to the admin pages and manage plugins. Click the disabled plugins tab and find the MS Teams Integration plugin and click the enable button. If the plugin is enabled already proceed to the next step.
Next, use the left navigation bag to find Integrations - > Chat Integrations and click the chat integrations link. The chat integrations page can support configuration of up to 3 messaging systems. Select the tab for TEAMS - if only TEAMs is enabled, then this will be the only tab as shown.
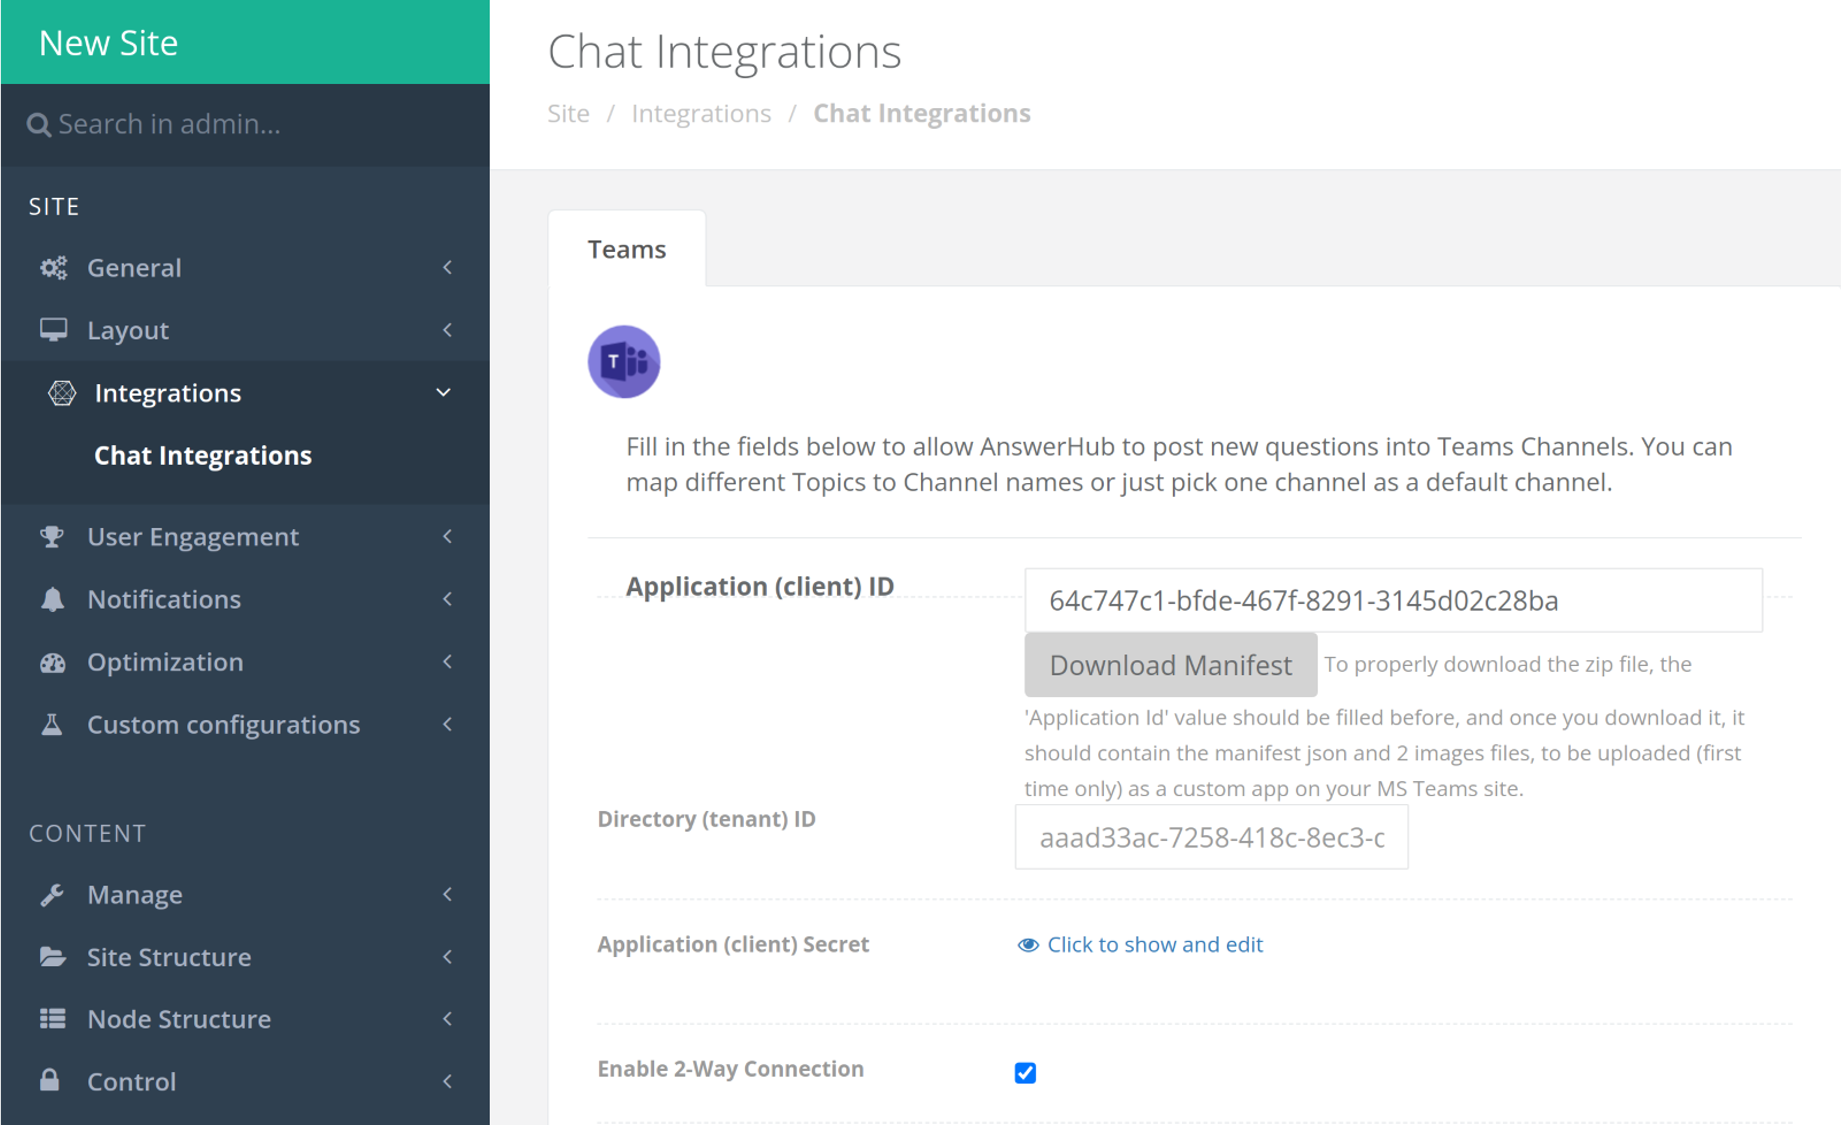
Now, enter the Application (Client) ID, the Directory (Tenant) ID, and the Application (Client) Secret. For the secret, click the link to expose the box so that it can be edited. Save these settings with the button at the bottom of the screen.
Then, click the Download Manifest button and make note of the filename and location on your local drive.
Now, upload the app to teams. There are several navigation paths in teams depending if the desktop or webapp are being used. From the desktop, click on the apps icon in the lower left, then manager your apps, and then upload a custom app in the center panel of the screen.
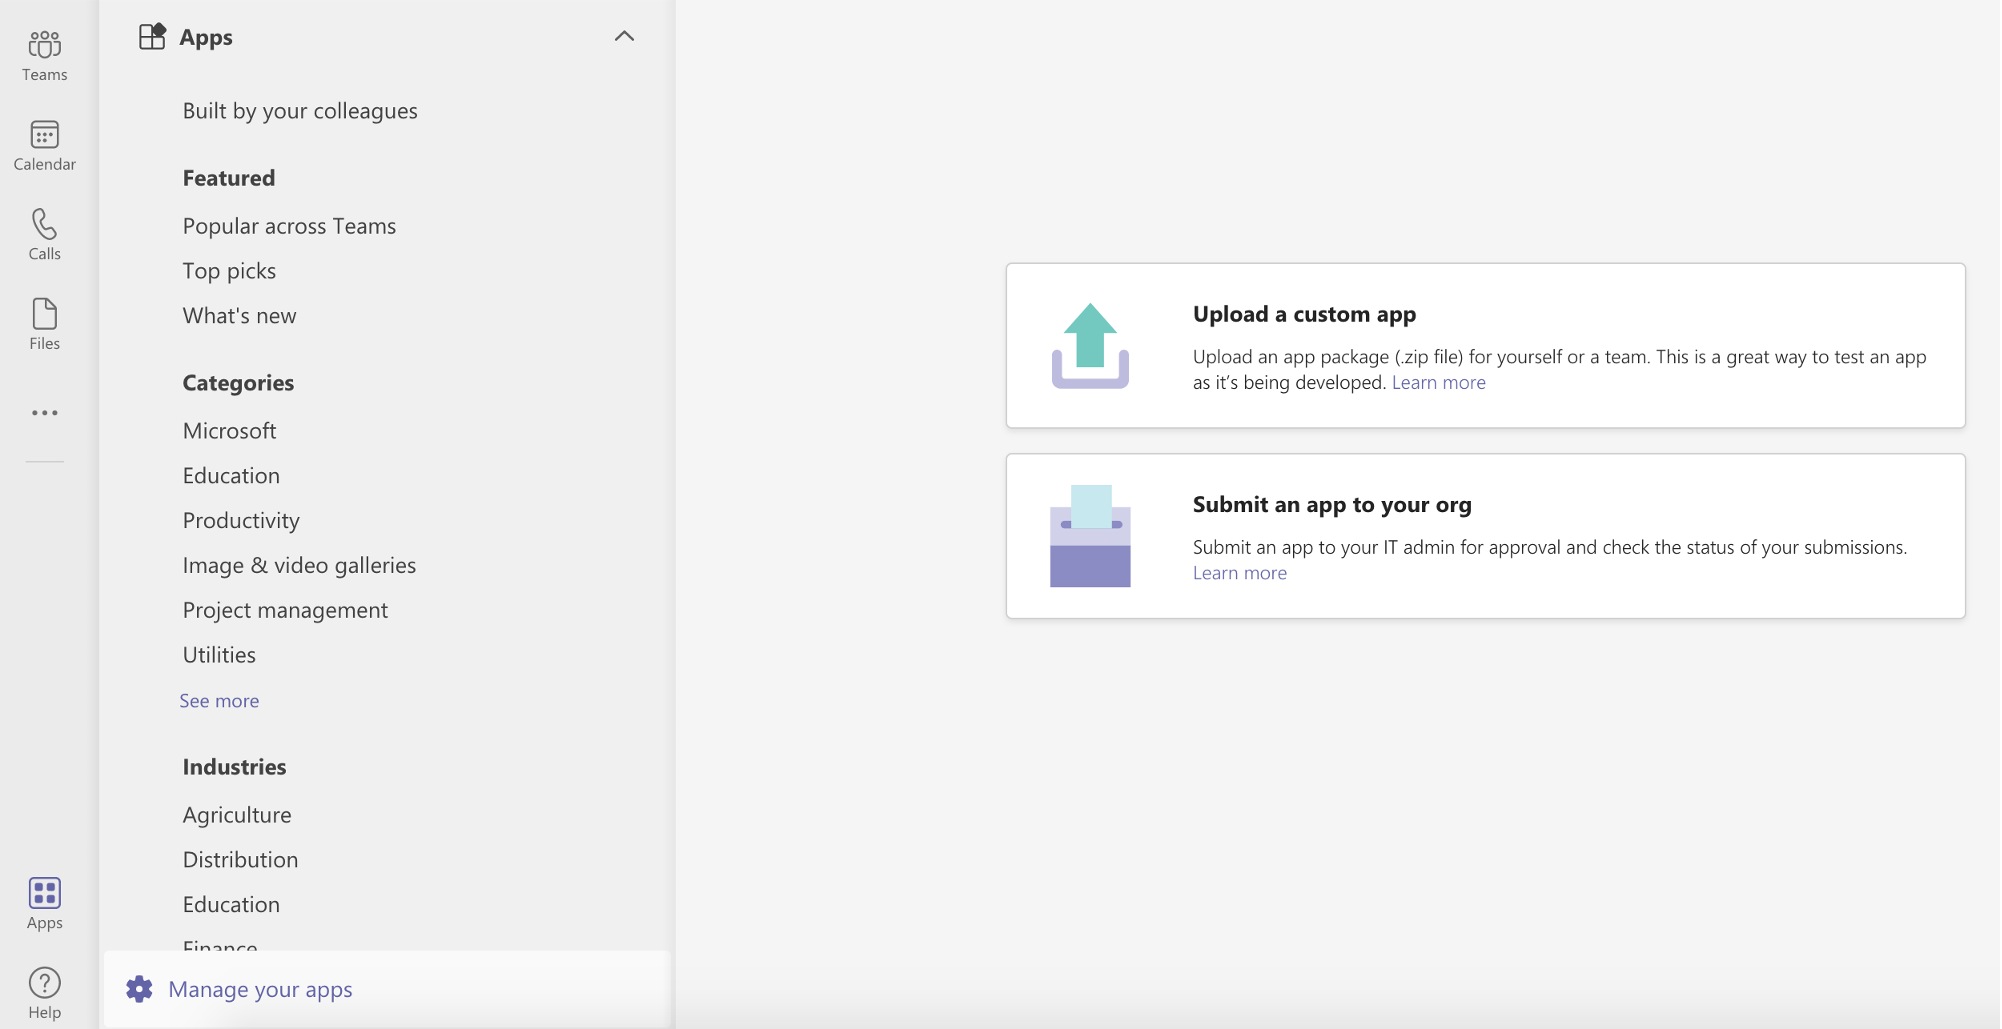
Select the zip file created by downloading the manifest in the earlier step, and after upload, a screen similar to the one below should be presented. Click add.
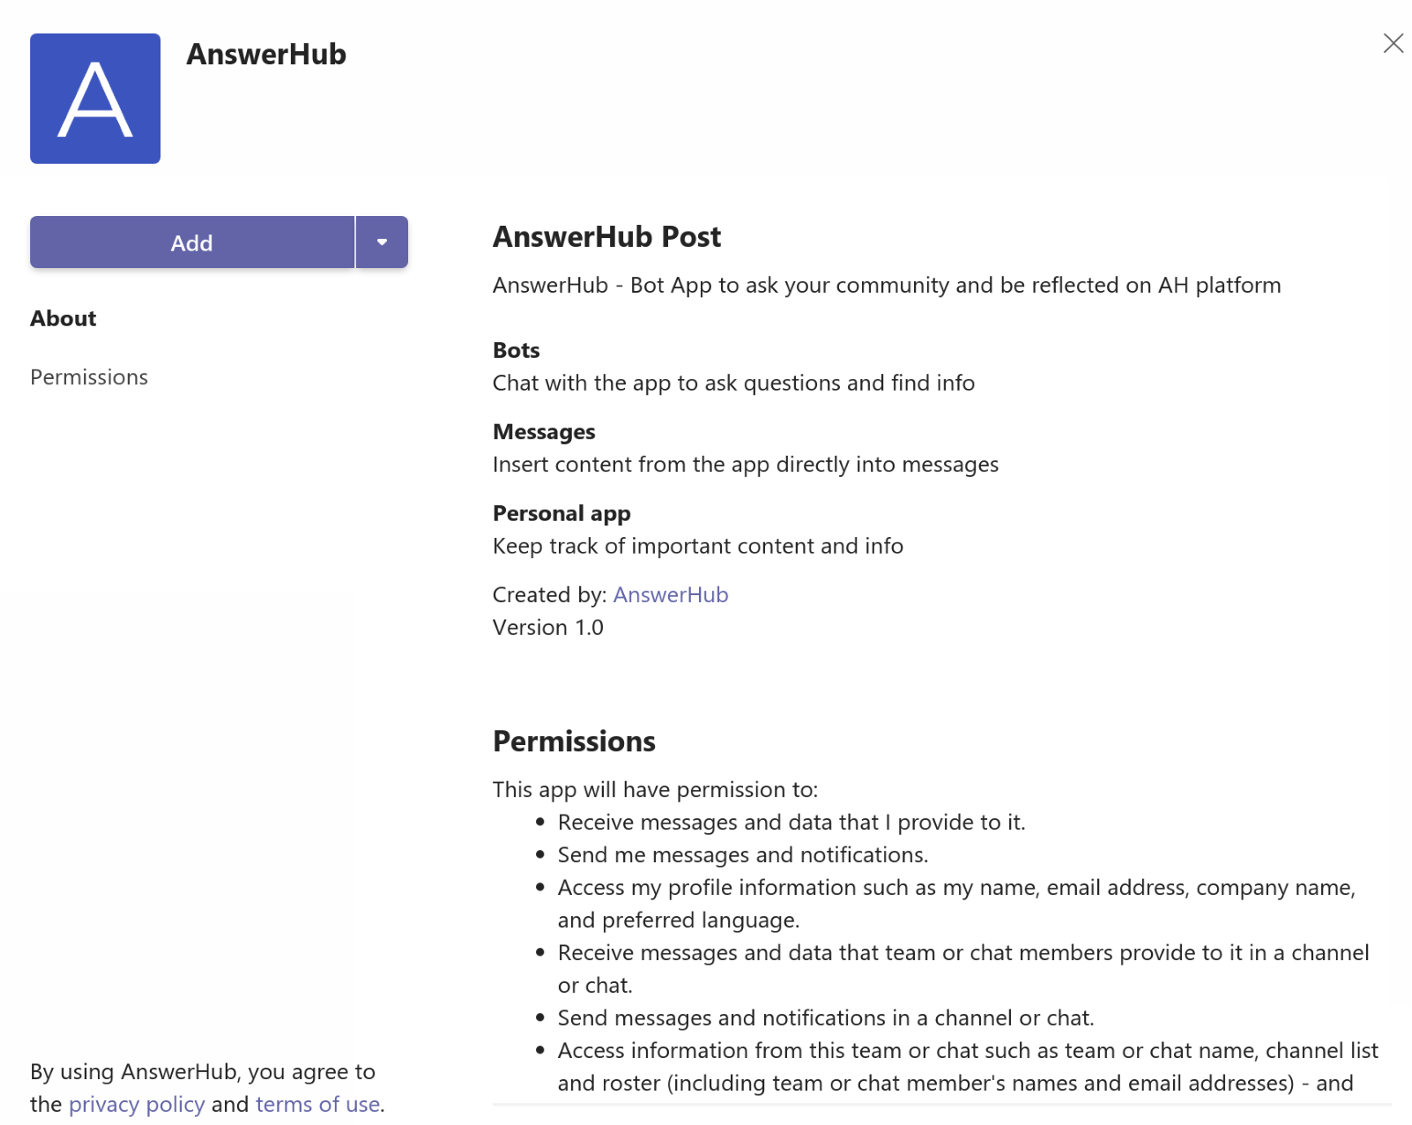
Now AnswerHub and Teams should be connected, and we can complete the rest of the configuration in the AnswerHub Admin panel for the chat integrations.
If you only wish to announce AnswerHub content on to TEAMS channels, then leave the two way integration box unchecked. If you wish to announce content and allow users on TEAMS to reply to content and to ASK new questions in AnswerHub from teams, then check the two way integration box.
Next, check the box for each type of content you wish to announce on TEAMS and update the message template for each type of content. These message templates control the format and content of the messages that are announced on teams. As a best practice, be sure to include the title and URL link so that TEAMS users can click the URL to jump into AnswerHub and directly engage with the full features of AnswerHub including Rich text editors, graphic images, file attachments and video.
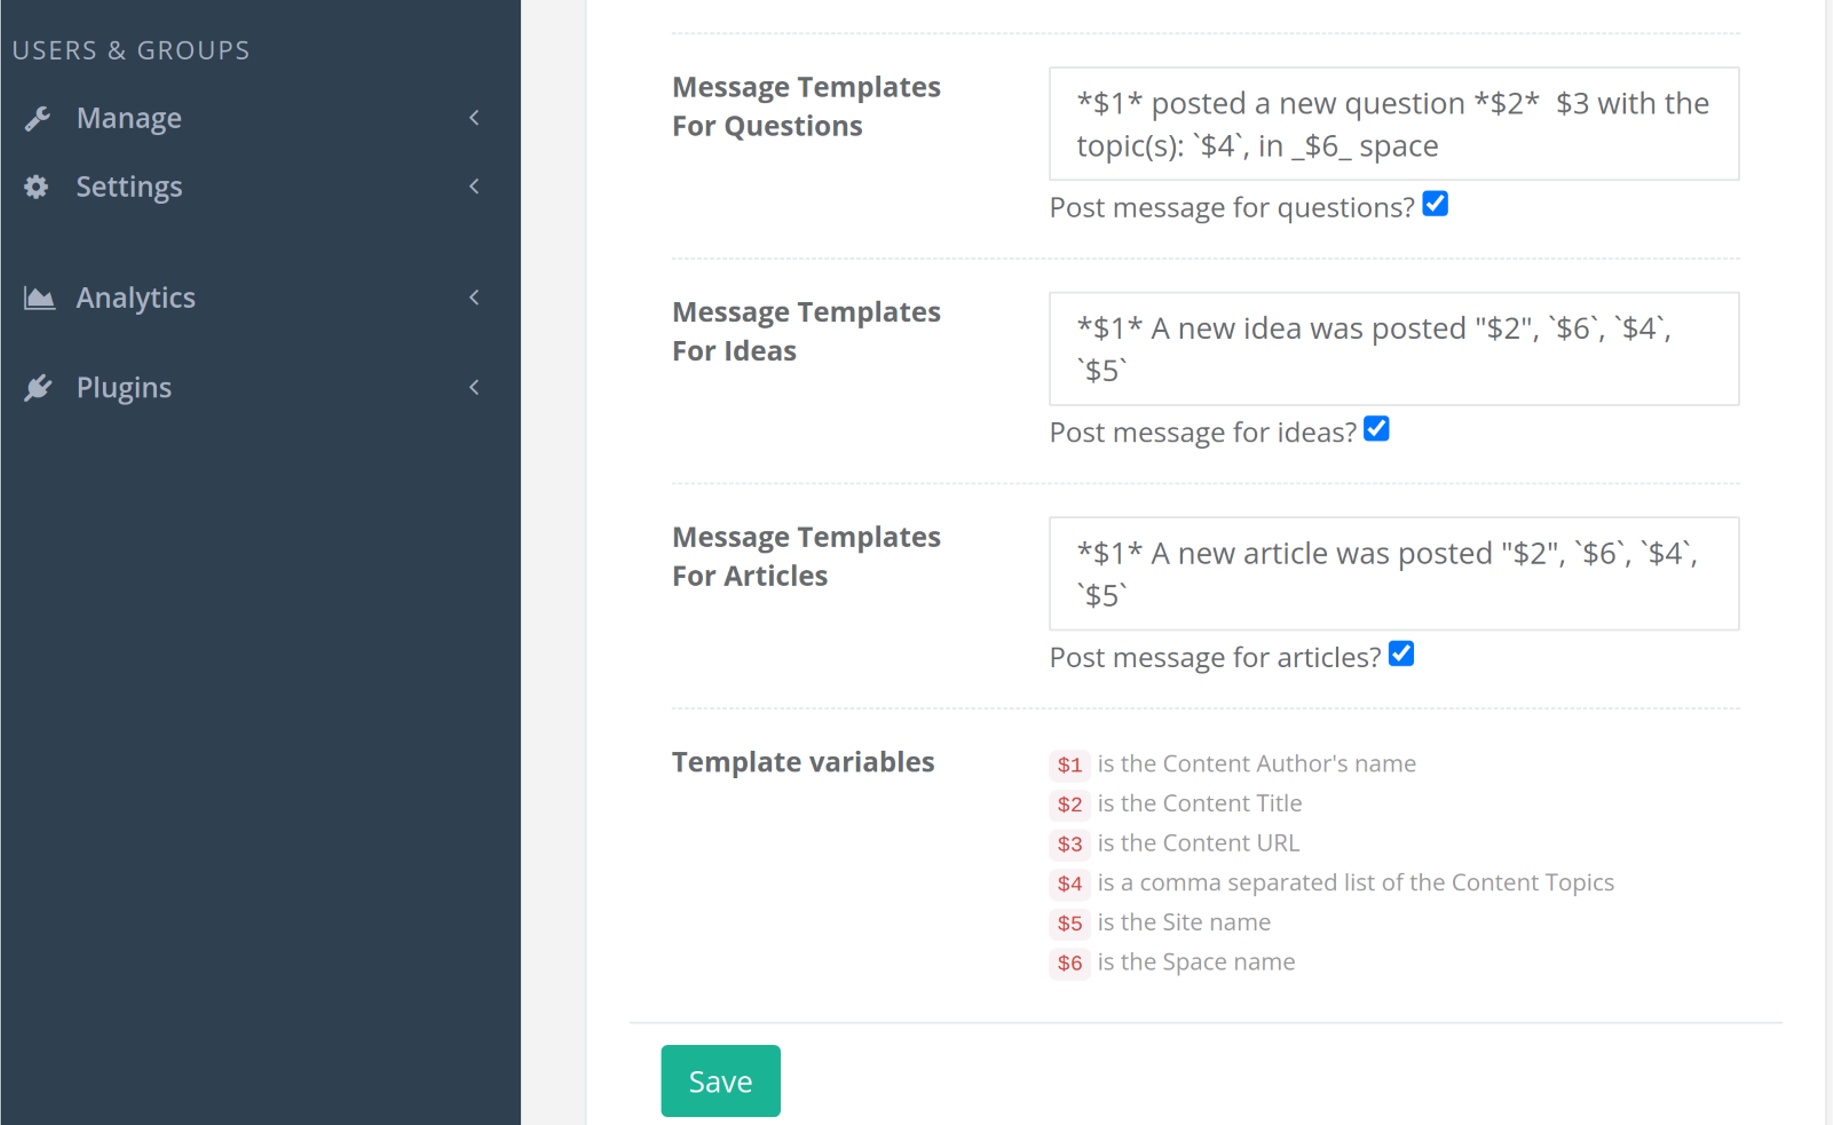
Then, select spaces and optionally, topics to map to TEAMS channels. If you are using the 2 way communication, it is important to map spaces to channels on a 1:1 basis and questions may only be asked on channels that have a mapped space. When content is posted to a space and the content is tagged with topics that are mapped to other channels, then the content will be announced once on each channel that was mapped.

In the 2.30.0 Release of AnswerHub, the Teams integration channel mapping section is enhanced to support clients that have a large number of teams and channels. To improve performance, the team is first selected by typing in the first 3 characters of the team and then selecting the team from the returned list. Next, the first 3 characters in the channel field will return the list of channels available for that particular team.
Click the Add button after making the selection of space / topic, space or topic name, team name, and channel name. This will create a mapping.
Repeat these steps for additional mappings. Mappings may be removed by clicking the trash can icon on the same line. The teams ID - Channel column shows the relationship of the team and the associated mapped channel.
Mapping ConsiderationsThe lookup of space names currently depends upon the existing space name plug that is shown in the URL when clicking the breadcrumbs for that space in the front end UI. If an admin has renamed a space, the space name shown on the drop down menu and in the manage spaces in the admin will not be the same as the original name plug when the space was created. If you are having trouble getting the desired space name to show up in the space selector, check the correct plug name for the space on the front end and begin typing that and it should be offered in the list of matching spaces.
Making Use of the Teams Integration
Asking a question from TEAMS
Navigate to a TEAMS channel that is mapped to a space in AnswerHub.
Type @AH and press enter
the AH bot should respond and you can click the purple section to bring up the ask modal

Clicking the purple section to Ask the community, the Ask modal is presented
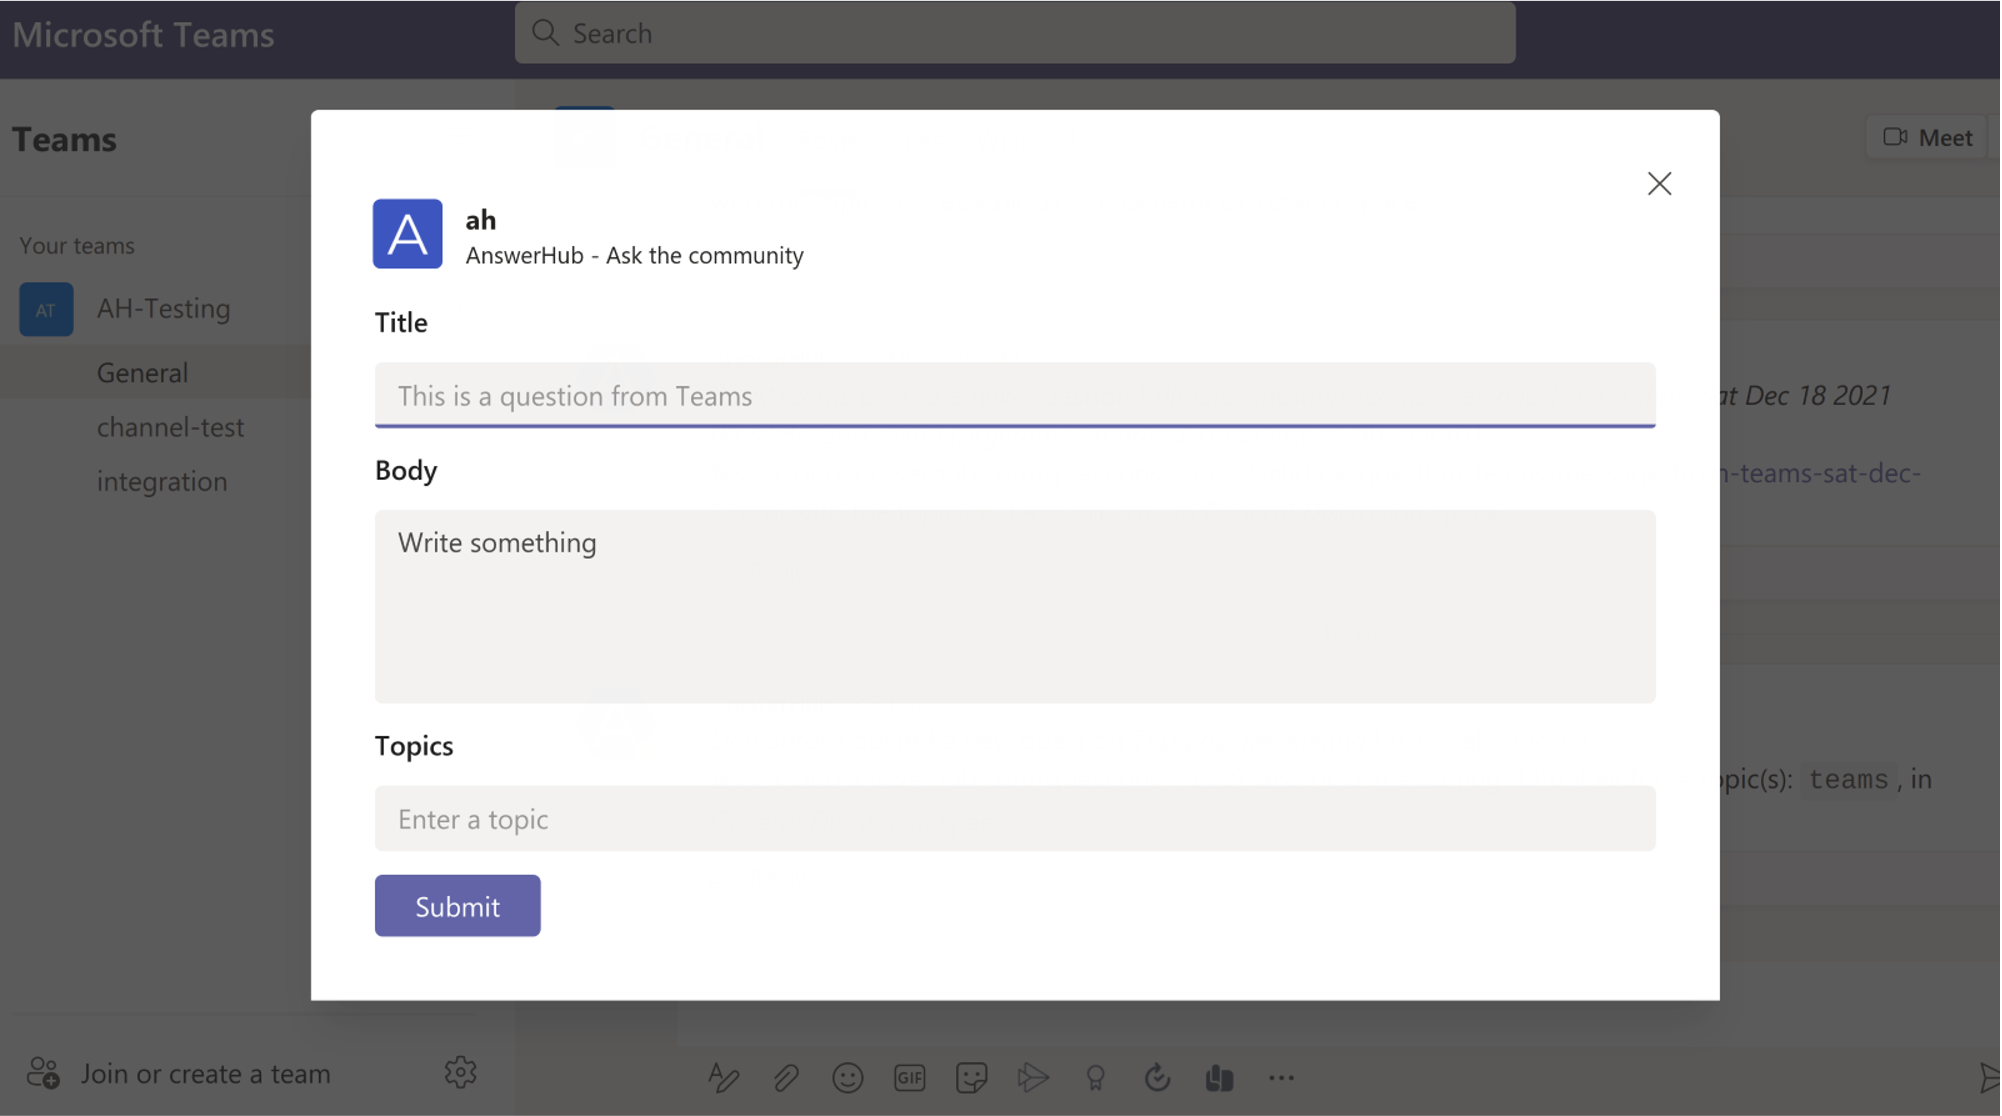
Select a title, add body content and enter topics as desired and submit the question when ready.
The title and body minimum length values specified in the AnswerHub admin must be met. If the user does not have an account matched in AnswerHub, the post will be made on behalf of the user by the TEAMS bot. The bot will follow the permissions of the User group in AnswerHub. As a result, the user group will need permission to ask questions, answer questions and comment on ideas and articles in order for replies to function properly from TEAMs. In addition, if the user group does not have permission to create new topics, then only existing topics may be used and any topics that don't exist in AnswerHub will be stripped when the question publishes in AnswerHub. For sorting convenience and to ensure that all questions have at least one topic, all Questions published from TEAMs will include the topic "TEAMS".
Questions, Ideas, Articles that are announced to TEAMS channels may be replied to. To reply, use the @AH mention to bring up the list of bots and select the AH bot from the list. AH will be shown in purple. Type your reply message and press enter. The reply will display in TEAMS and will be added to the corresponding AnswerHub content as an Answer for Questions, or as a comment on Ideas and Articles.
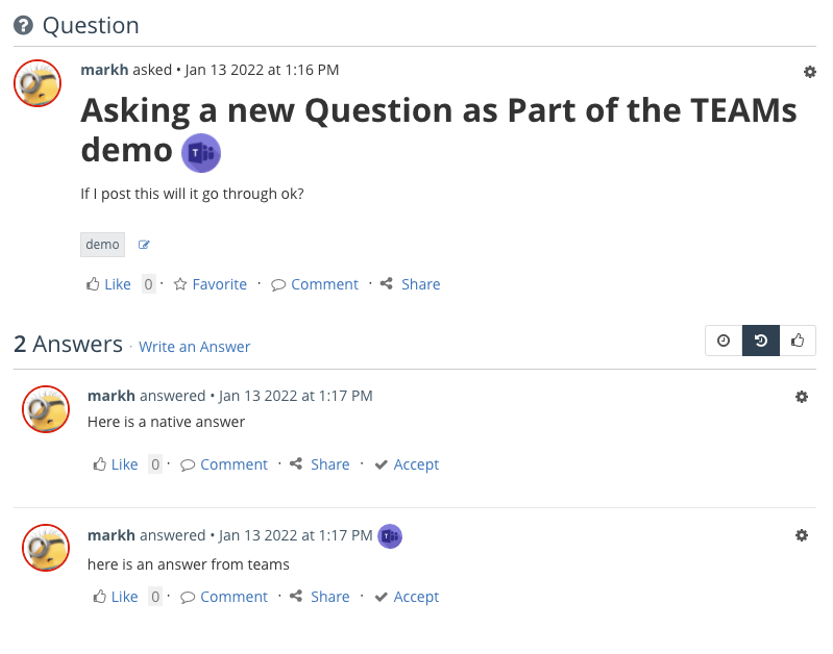
Questions that originate from TEAMS will include a TEAMS icon next to the question title in list view and question thread views within AnswerHub. Answers and comments that originate in TEAMs are also identified in the same way as shown below.
Updated 3 months ago
